> ## Documentation Index
> Fetch the complete documentation index at: https://docs.preview.x6.ai/llms.txt
> Use this file to discover all available pages before exploring further.

# VS Code

> 本文档仅供参考，演示如何配置我们的 API 与第三方 AI 聊天界面配合使用。文中提及的任何第三方软件、网站或服务均非由我们运营、控制或背书。

# **VS Code 简介**
<Frame>
  <img src="https://mintcdn.com/x6/el_h-gJpYp66h95k/images/image-94.webp?fit=max&auto=format&n=el_h-gJpYp66h95k&q=85&s=003be267b368eab35b581c720e194e0e" alt="Image" width="1600" height="955" data-path="images/image-94.webp" />
</Frame>

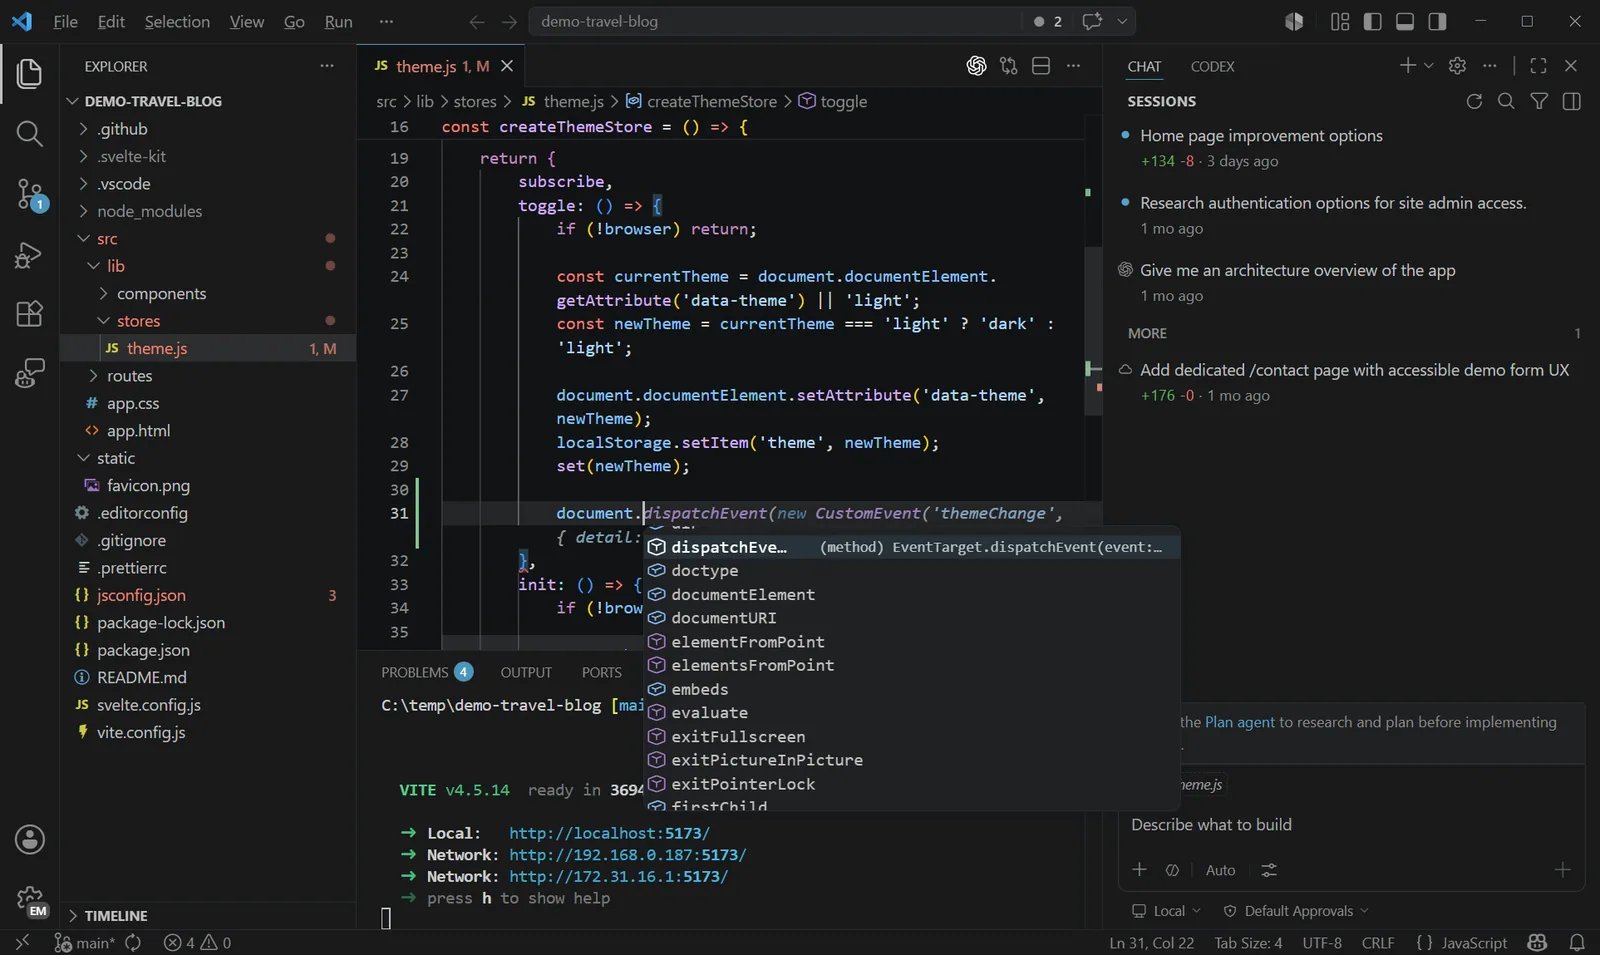
[<u>Visual Studio Code</u>](https://code.visualstudio.com/) 是基于 `Code - OSS` 仓库、加入 Microsoft 定制功能后，按传统 [<u>Microsoft 产品许可证</u>](https://code.visualstudio.com/License/) 发布的发行版。

[<u>Visual Studio Code</u>](https://code.visualstudio.com/) 兼具代码编辑器的简洁与开发者在核心"编辑—构建—调试"流程中所需的功能。它提供全面的代码编辑、导航与理解支持，以及轻量级调试、丰富的可扩展模型，并能与现有工具轻量集成。

# **步骤**

<Steps>
  <Step title="安装 VS Code">
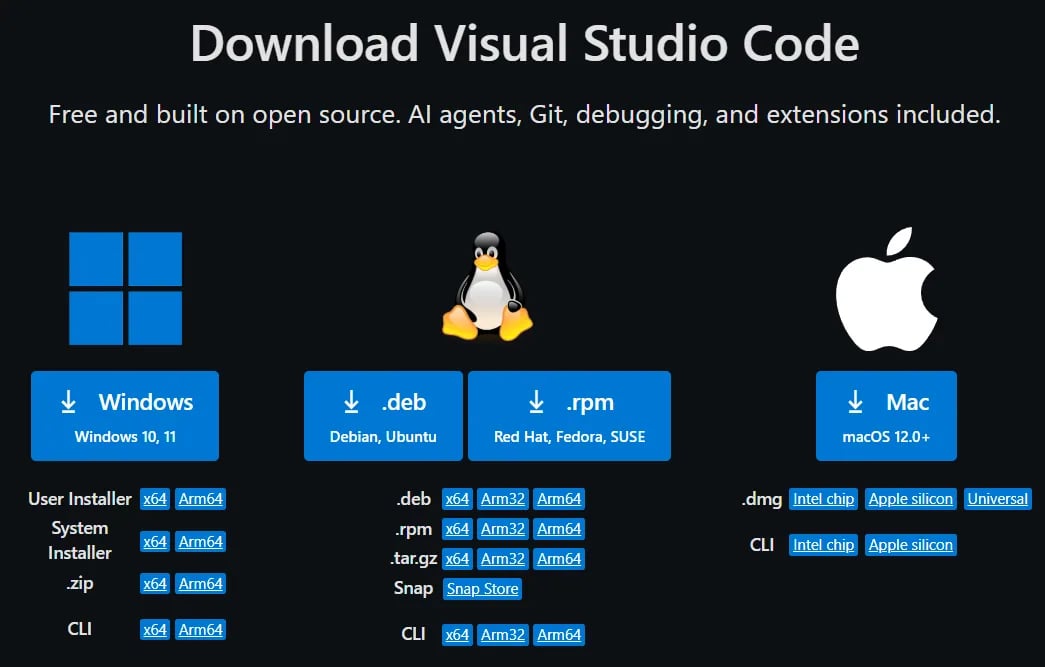
    Visual Studio Code 每月更新，带来新功能与缺陷修复。你可以在 [<u>Visual Studio Code 官网</u>](https://code.visualstudio.com/Download) 下载适用于 Windows、macOS 和 Linux 的版本。如需每天获取最新版本，可安装 [<u>Insiders 版</u>](https://code.visualstudio.com/insiders)。
    <Frame>
      <img src="https://mintcdn.com/x6/el_h-gJpYp66h95k/images/image-95.webp?fit=max&auto=format&n=el_h-gJpYp66h95k&q=85&s=f4c365da7c1dd2e13a382df544c06a77" alt="Image" width="1045" height="667" data-path="images/image-95.webp" />
    </Frame>
  </Step>

  <Step title="模型配置与 API Key">
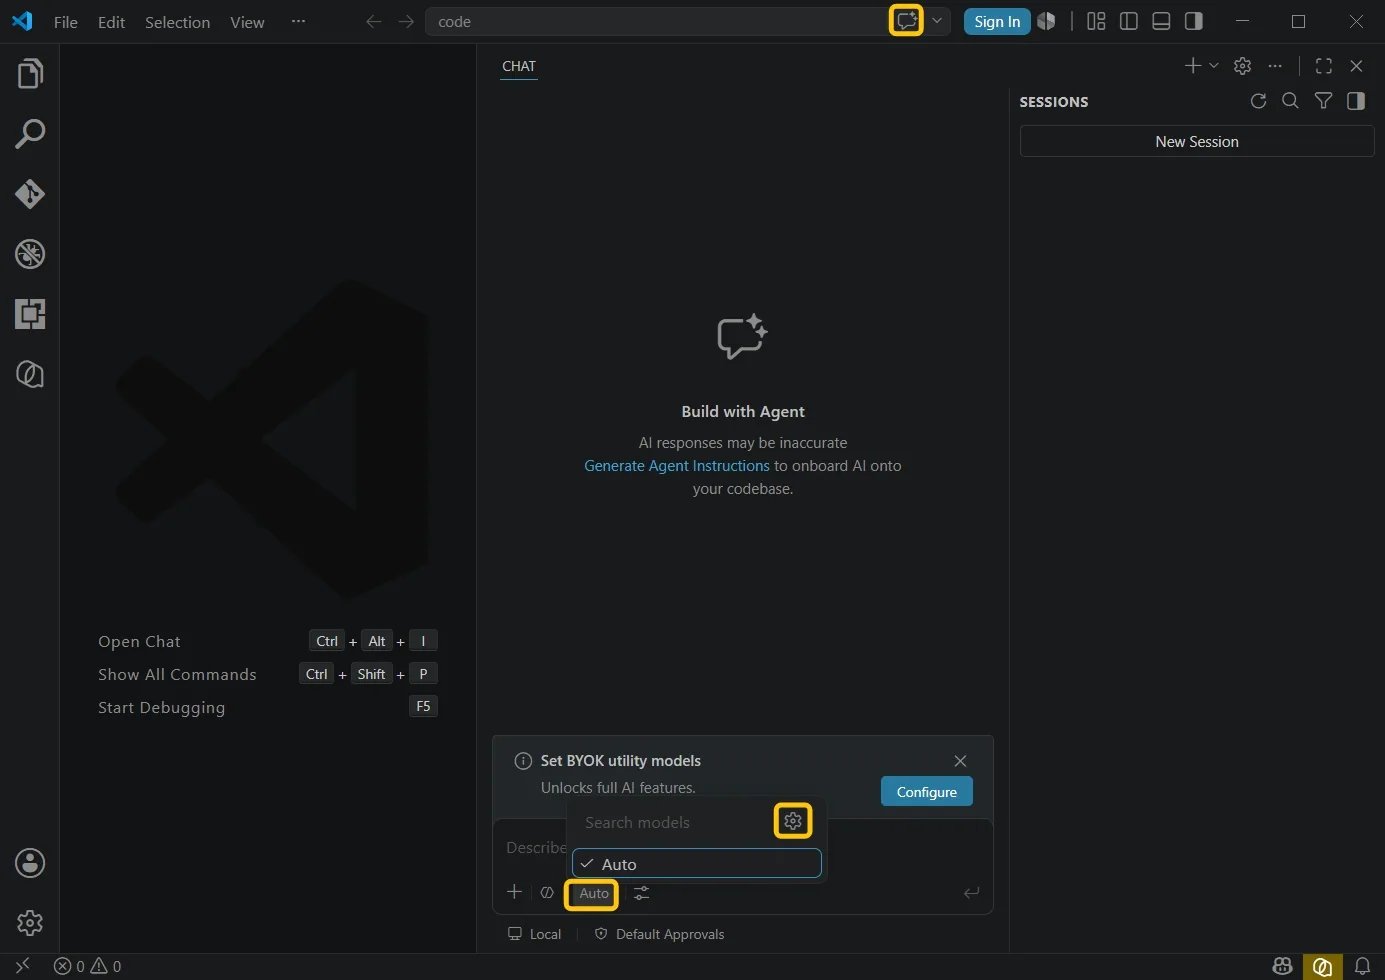
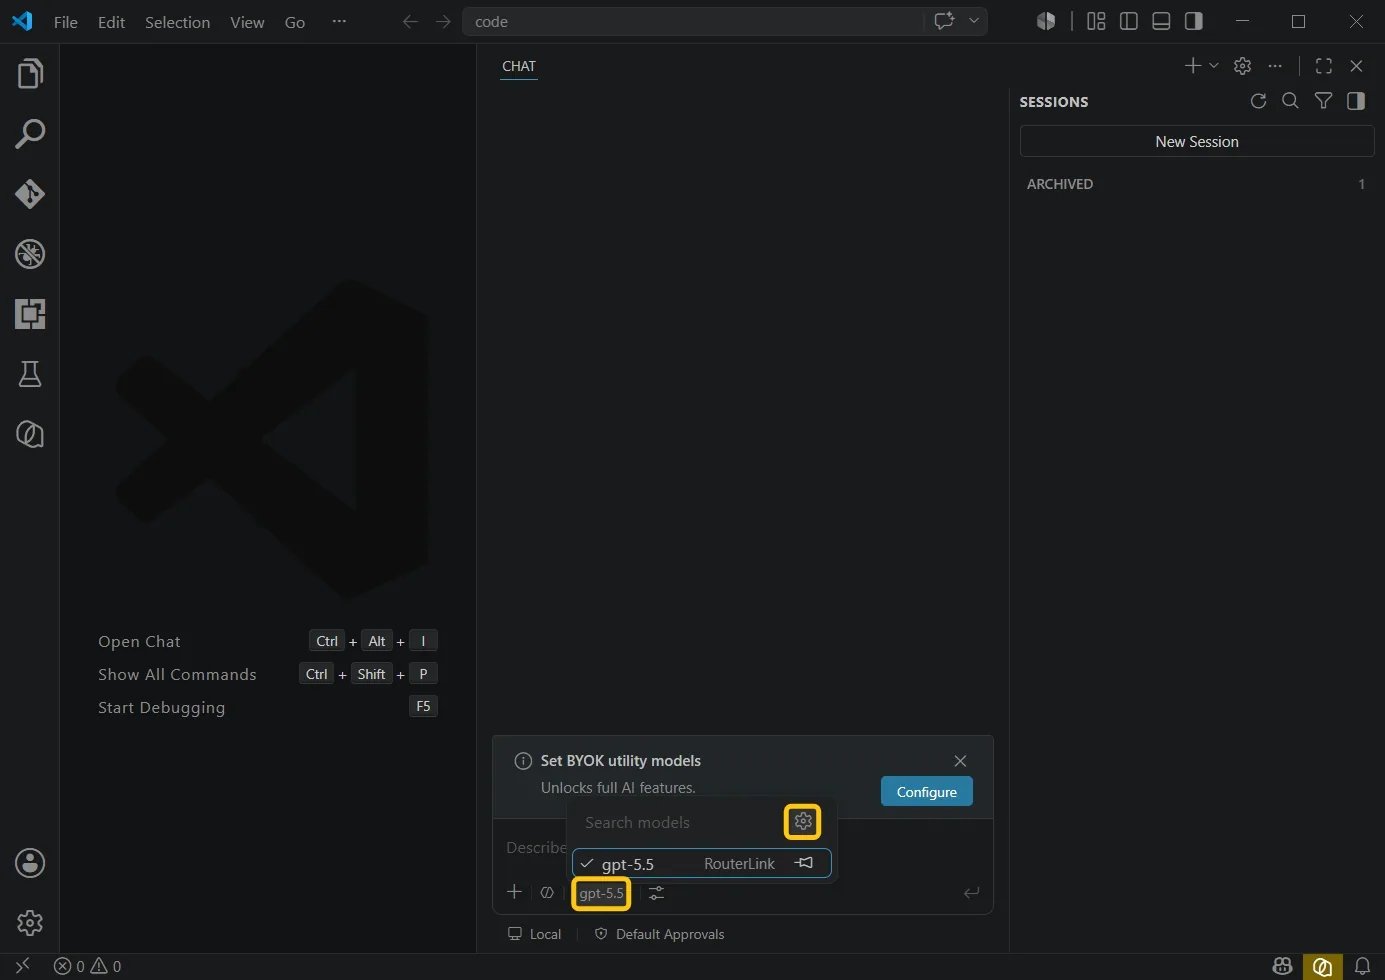
    点击顶部的 **Toggle Chat** 按钮（快捷键：`Ctrl+Alt+I`）。点击底部的模型，然后点击设置图标。

    <Frame>
      <img src="https://mintcdn.com/x6/el_h-gJpYp66h95k/images/img_v3_0212u_3742f979-d56c-4a37-81dd-a0cd8450f1hu.webp?fit=max&auto=format&n=el_h-gJpYp66h95k&q=85&s=cf6072cfcc47e2927565d28e004a8969" alt="Img V3 0212u 3742f979 D56c 4a37 81dd A0cd8450f1hu" width="1385" height="980" data-path="images/img_v3_0212u_3742f979-d56c-4a37-81dd-a0cd8450f1hu.webp" />
    </Frame>

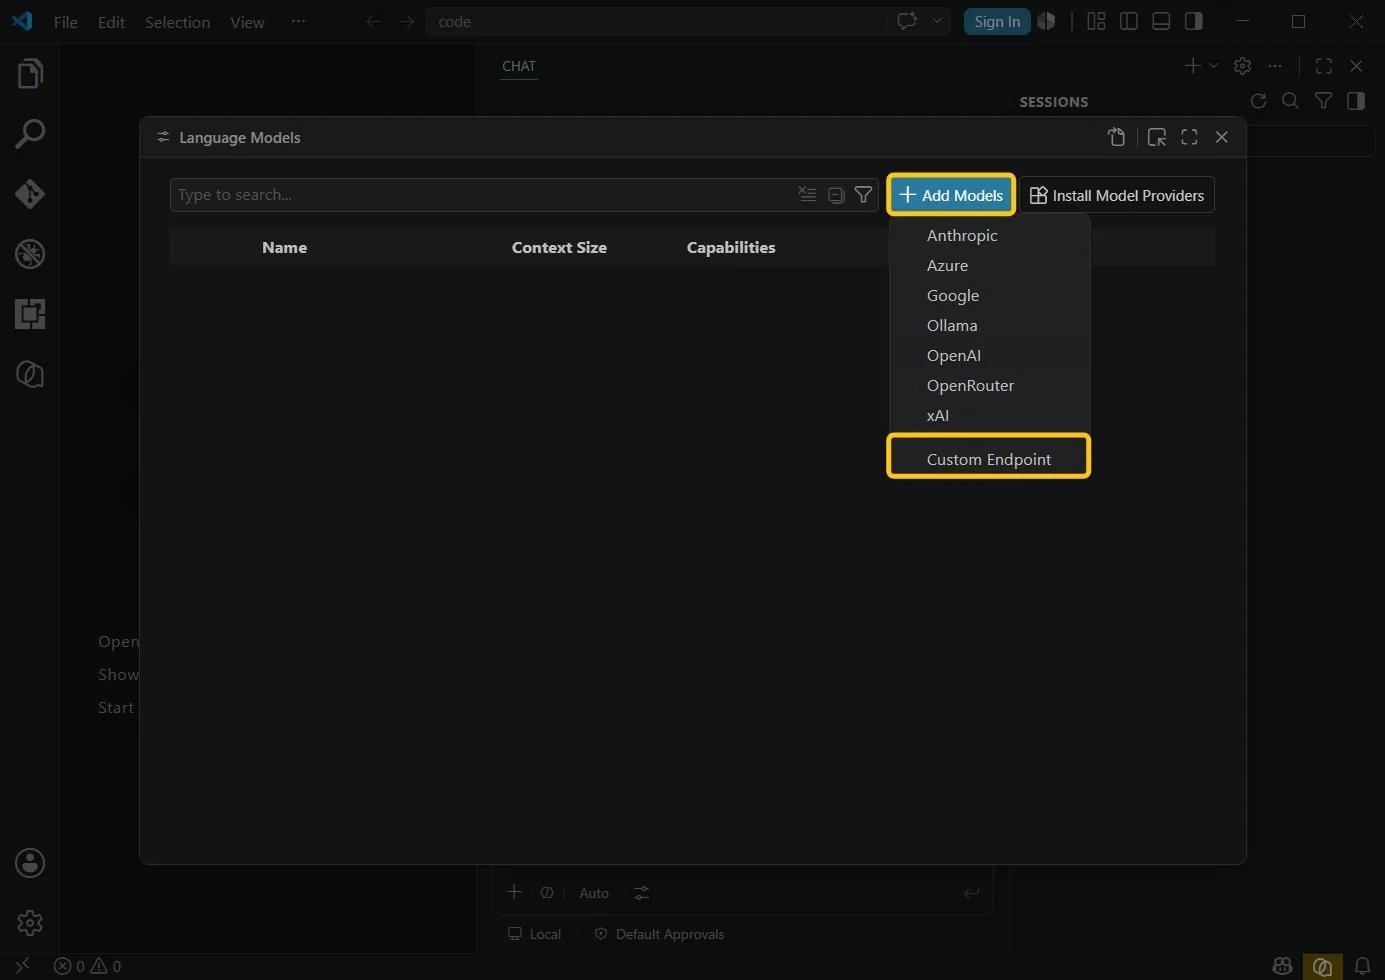
    选择 **"Add Model"**，然后点击 **"Custom Endpoint"**。

    <Frame>
      <img src="https://mintcdn.com/x6/el_h-gJpYp66h95k/images/img_v3_0212u_a515d6af-a4eb-499e-8828-264d2c7f6ehu.webp?fit=max&auto=format&n=el_h-gJpYp66h95k&q=85&s=b3aa8a366ed306d2e87928488e1389d8" alt="Img V3 0212u A515d6af A4eb 499e 8828 264d2c7f6ehu" width="1385" height="980" data-path="images/img_v3_0212u_a515d6af-a4eb-499e-8828-264d2c7f6ehu.webp" />
    </Frame>

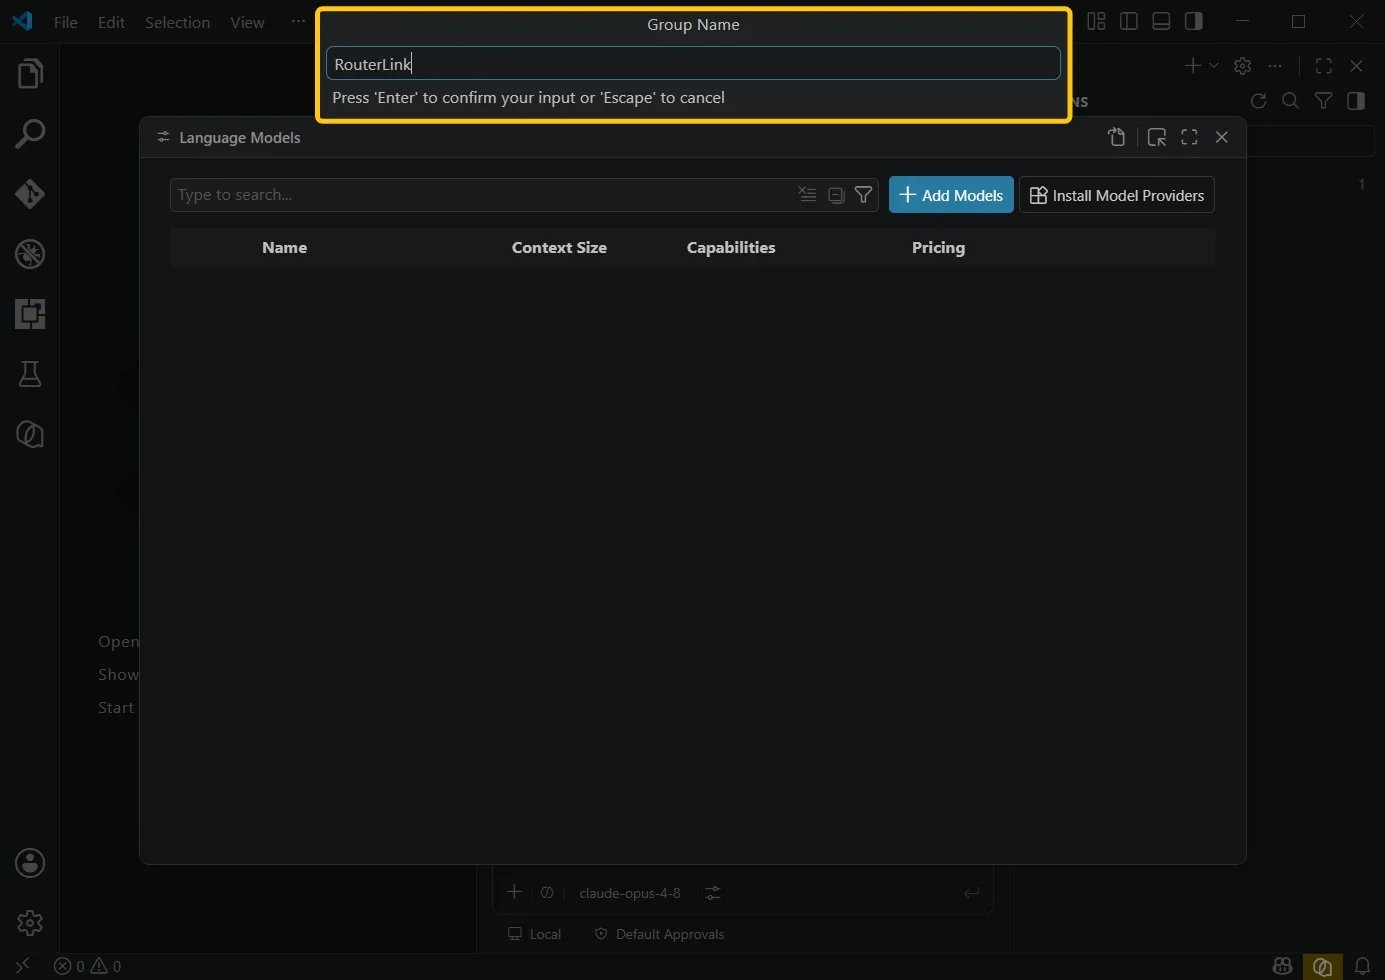
    填写任意分组名称。

    <Frame>
      <img src="https://mintcdn.com/x6/el_h-gJpYp66h95k/images/img_v3_0212u_a041fd48-c92f-4da0-b702-0f2cdeabf2hu.webp?fit=max&auto=format&n=el_h-gJpYp66h95k&q=85&s=0ad0cc047953b5631f00158e35ddd85e" alt="Img V3 0212u A041fd48 C92f 4da0 B702 0f2cdeabf2hu" width="1385" height="980" data-path="images/img_v3_0212u_a041fd48-c92f-4da0-b702-0f2cdeabf2hu.webp" />
    </Frame>

    填入你的 API Key，可从 [x6.ai](https://x6.ai/settings/api-keys) 获取。

    <Frame>
      <img src="https://mintcdn.com/x6/el_h-gJpYp66h95k/images/img_v3_0212u_be682689-a0ca-4957-9960-0d1569ee7bhu.webp?fit=max&auto=format&n=el_h-gJpYp66h95k&q=85&s=fb3cbb59a0d72dc32d73772a7fa830ae" alt="Img V3 0212u Be682689 A0ca 4957 9960 0d1569ee7bhu" width="758" height="121" data-path="images/img_v3_0212u_be682689-a0ca-4957-9960-0d1569ee7bhu.webp" />
    </Frame>

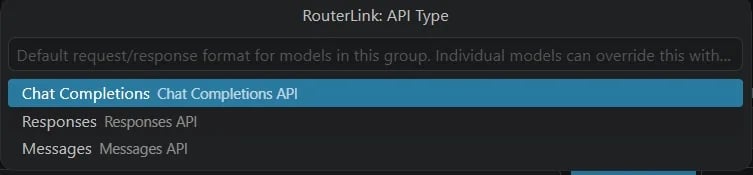
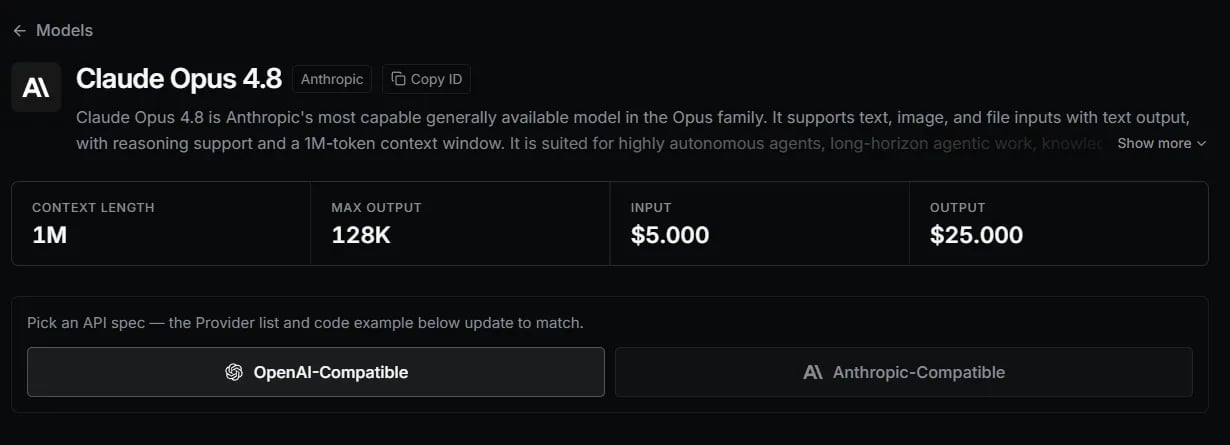
    如果你想使用 x6.ai 的[模型](https://x6.ai/models)：

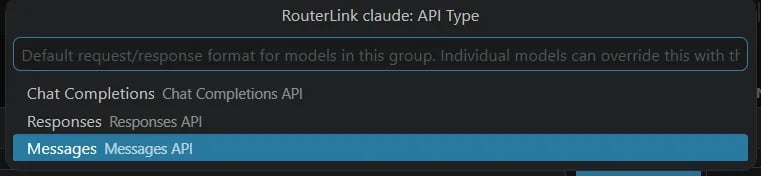
    对于 OpenAI 兼容模型，选择 **Chat Completions**。

    对于 Anthropic 兼容模型，选择 **Messages API**。

    <Frame>
      <img src="https://mintcdn.com/x6/el_h-gJpYp66h95k/images/img_v3_0212u_5c7d0ded-4dc1-4cd5-a250-cb883e9e13hu.webp?fit=max&auto=format&n=el_h-gJpYp66h95k&q=85&s=0ba04a6b11def8a3d674dae19e614de2" alt="Img V3 0212u 5c7d0ded 4dc1 4cd5 A250 Cb883e9e13hu" width="753" height="175" data-path="images/img_v3_0212u_5c7d0ded-4dc1-4cd5-a250-cb883e9e13hu.webp" />
    </Frame>

    <Frame>
      <img src="https://mintcdn.com/x6/el_h-gJpYp66h95k/images/image-96.webp?fit=max&auto=format&n=el_h-gJpYp66h95k&q=85&s=a0e25de3d55a81217c9e1b8eefddac1e" alt="Image" width="1230" height="445" data-path="images/image-96.webp" />
    </Frame>

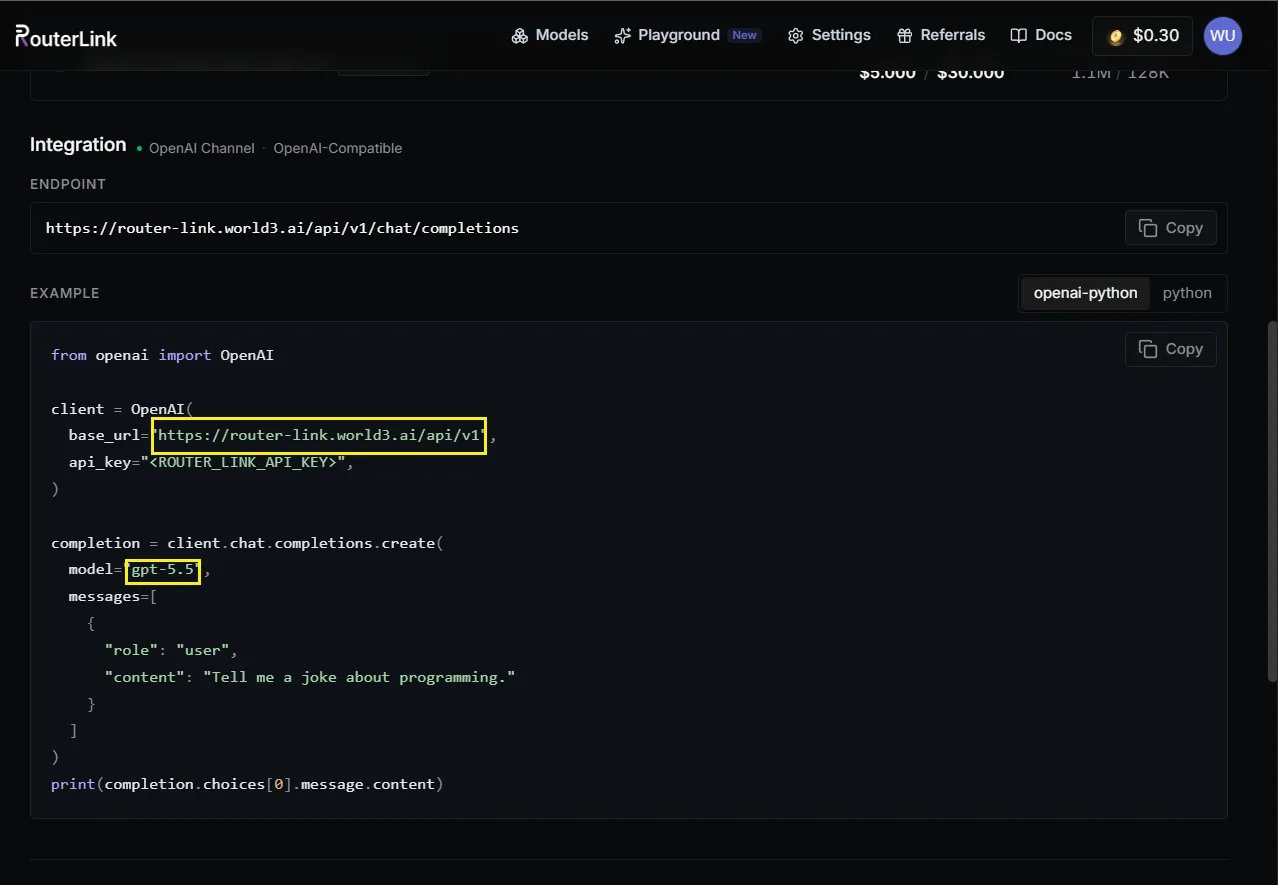
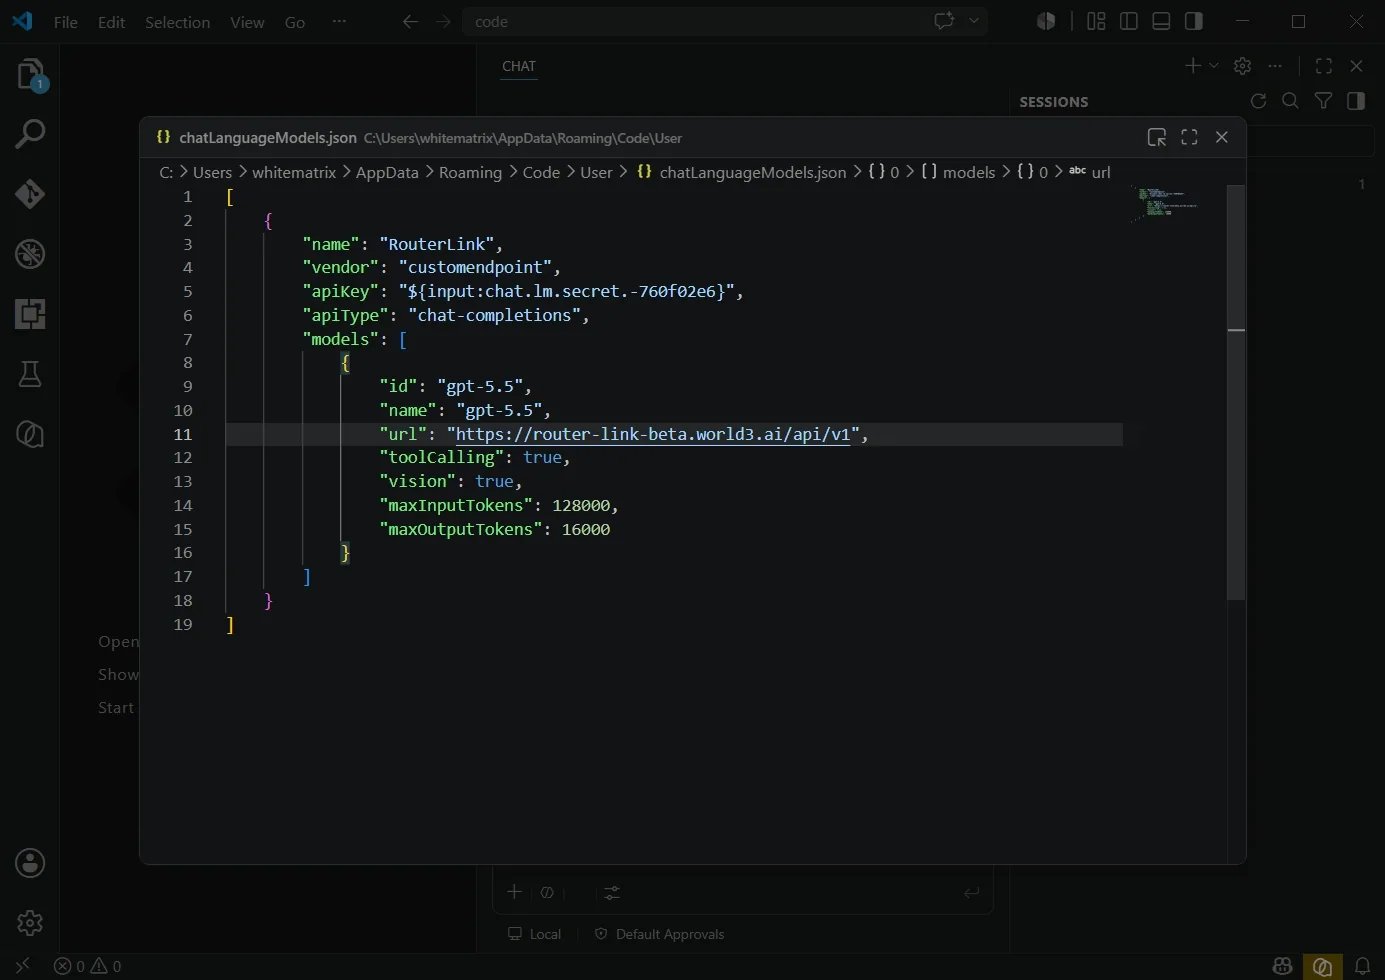
    以 GPT-5.5 为例，填入以下信息：

    | **字段** | **内容**                                       |
    | :----- | :------------------------------------------- |
    | id     | gpt-5.5                                      |
    | name   | gpt-5.5                                      |
    | url    | [https://api.x6.ai/v1](https://api.x6.ai/v1) |
    <Frame>
      <img src="https://mintcdn.com/x6/el_h-gJpYp66h95k/images/img_v3_0212u_be77f898-4f90-45db-99dc-2d80d0b363hu.webp?fit=max&auto=format&n=el_h-gJpYp66h95k&q=85&s=5dd2dce15eae5daec5f873f5c47bc456" alt="Img V3 0212u Be77f898 4f90 45db 99dc 2d80d0b363hu" width="1385" height="980" data-path="images/img_v3_0212u_be77f898-4f90-45db-99dc-2d80d0b363hu.webp" />
    </Frame>

    <Frame>
      <img src="https://mintcdn.com/x6/el_h-gJpYp66h95k/images/image-97.webp?fit=max&auto=format&n=el_h-gJpYp66h95k&q=85&s=6dc14b69398812fced905c2033d9dada" alt="Image" width="1278" height="885" data-path="images/image-97.webp" />
    </Frame>

    按 **Ctrl + S** 保存，然后点击 **Close**。

    如果你想再添加一个模型，以 **Claude Opus 4.8** 为例。

    再次点击底部的模型，并点击 **Settings** 图标。

    <Frame>
      <img src="https://mintcdn.com/x6/el_h-gJpYp66h95k/images/img_v3_0212u_60f2610b-09e5-40e8-ab9b-f4fb9094d3hu.webp?fit=max&auto=format&n=el_h-gJpYp66h95k&q=85&s=d646d3c0376f06d2555fd8636accf76f" alt="Img V3 0212u 60f2610b 09e5 40e8 Ab9b F4fb9094d3hu" width="1385" height="980" data-path="images/img_v3_0212u_60f2610b-09e5-40e8-ab9b-f4fb9094d3hu.webp" />
    </Frame>

    重复前面的步骤，并将 **API Type** 选择为 **Messages**。

    <Frame>
      <img src="https://mintcdn.com/x6/el_h-gJpYp66h95k/images/img_v3_0212u_41b99b19-e541-4221-9397-1227de7649hu.webp?fit=max&auto=format&n=el_h-gJpYp66h95k&q=85&s=736034b25eed6b18ec2722c5a3484872" alt="Img V3 0212u 41b99b19 E541 4221 9397 1227de7649hu" width="761" height="176" data-path="images/img_v3_0212u_41b99b19-e541-4221-9397-1227de7649hu.webp" />
    </Frame>

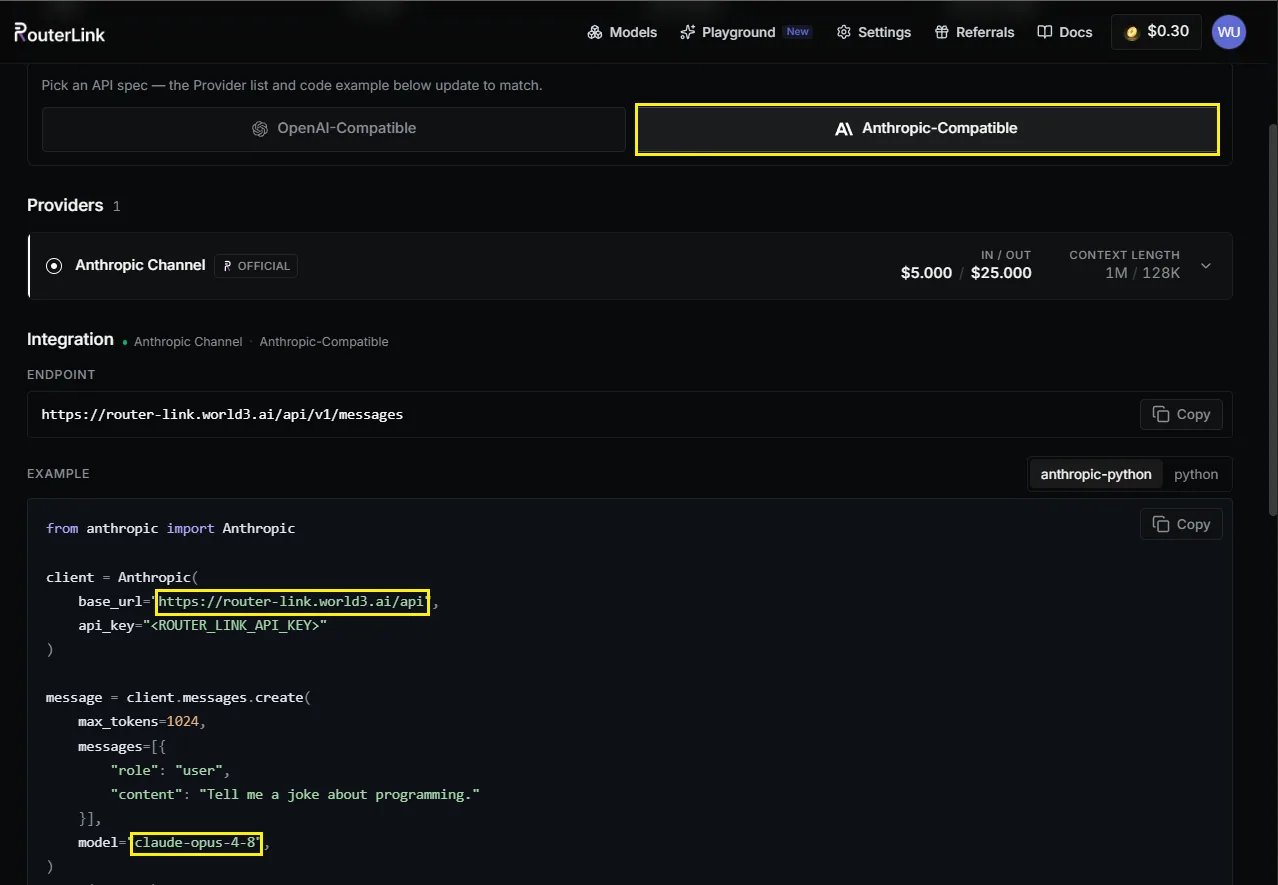
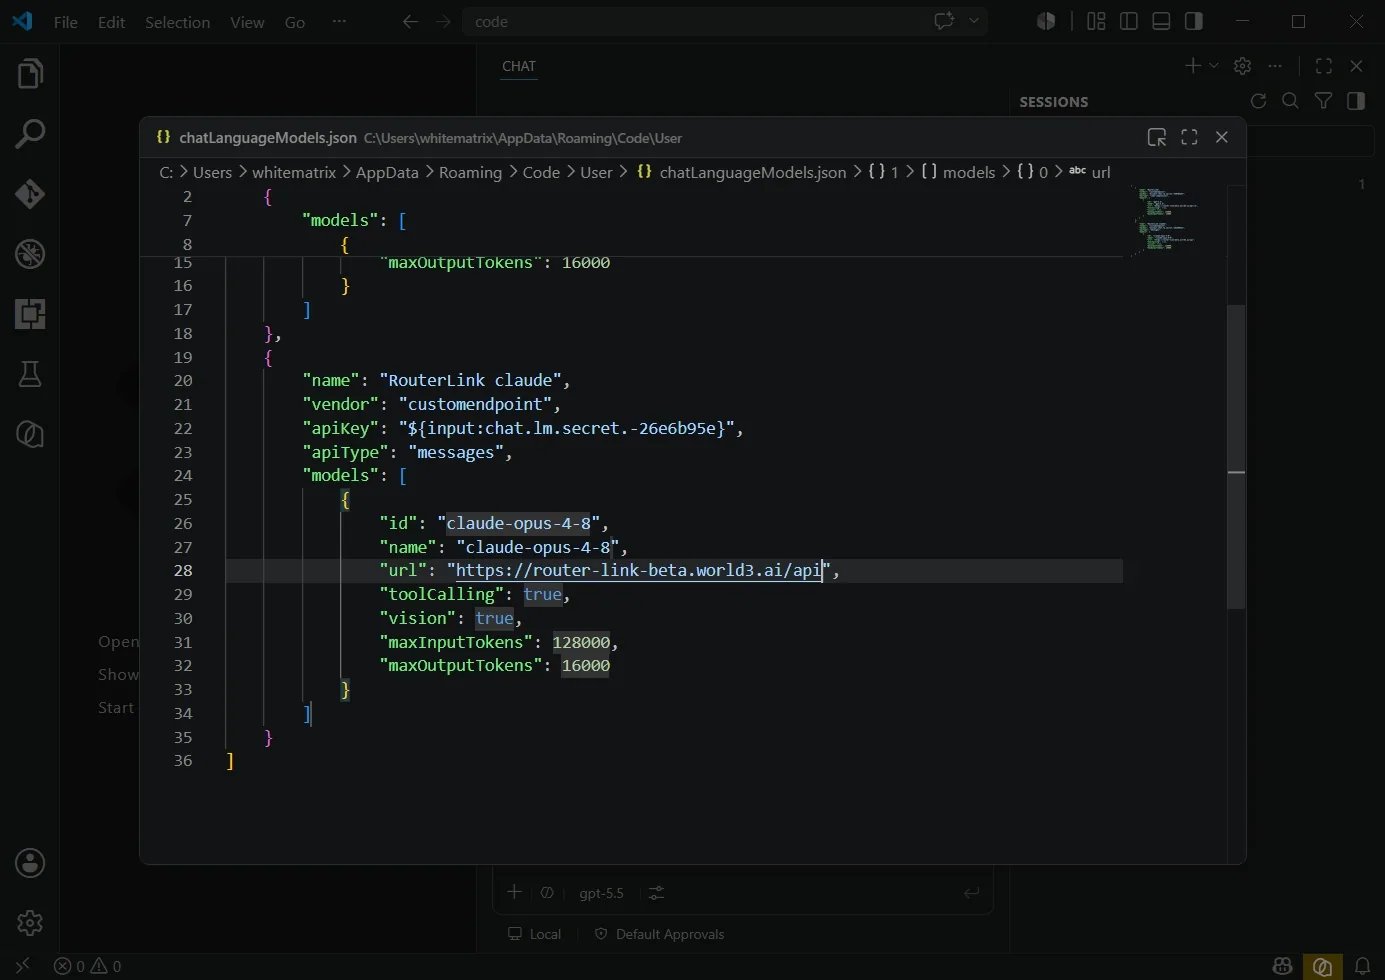
    为 Anthropic 兼容的 **Claude Opus 4.8** 模型填入以下信息：

    | **字段** | **内容**                                 |
    | :----- | :------------------------------------- |
    | id     | claude-opus-4-8                        |
    | name   | claude-opus-4-8                        |
    | url    | [https://api.x6.ai](https://api.x6.ai) |
    <Frame>
      <img src="https://mintcdn.com/x6/el_h-gJpYp66h95k/images/img_v3_0212u_e3b4170c-0414-44cc-8ce6-b1e09590e8hu.webp?fit=max&auto=format&n=el_h-gJpYp66h95k&q=85&s=538b5328d77964fed9d66985dca7f553" alt="Img V3 0212u E3b4170c 0414 44cc 8ce6 B1e09590e8hu" width="1385" height="980" data-path="images/img_v3_0212u_e3b4170c-0414-44cc-8ce6-b1e09590e8hu.webp" />
    </Frame>

    <Frame>
      <img src="https://mintcdn.com/x6/el_h-gJpYp66h95k/images/image-98.webp?fit=max&auto=format&n=el_h-gJpYp66h95k&q=85&s=89020e2c06de0a20ec928034851ca15a" alt="Image" width="1278" height="885" data-path="images/image-98.webp" />
    </Frame>

    **按 Ctrl + S 保存，然后点击 Close。**
  </Step>

  <Step title="使用 VS Code">
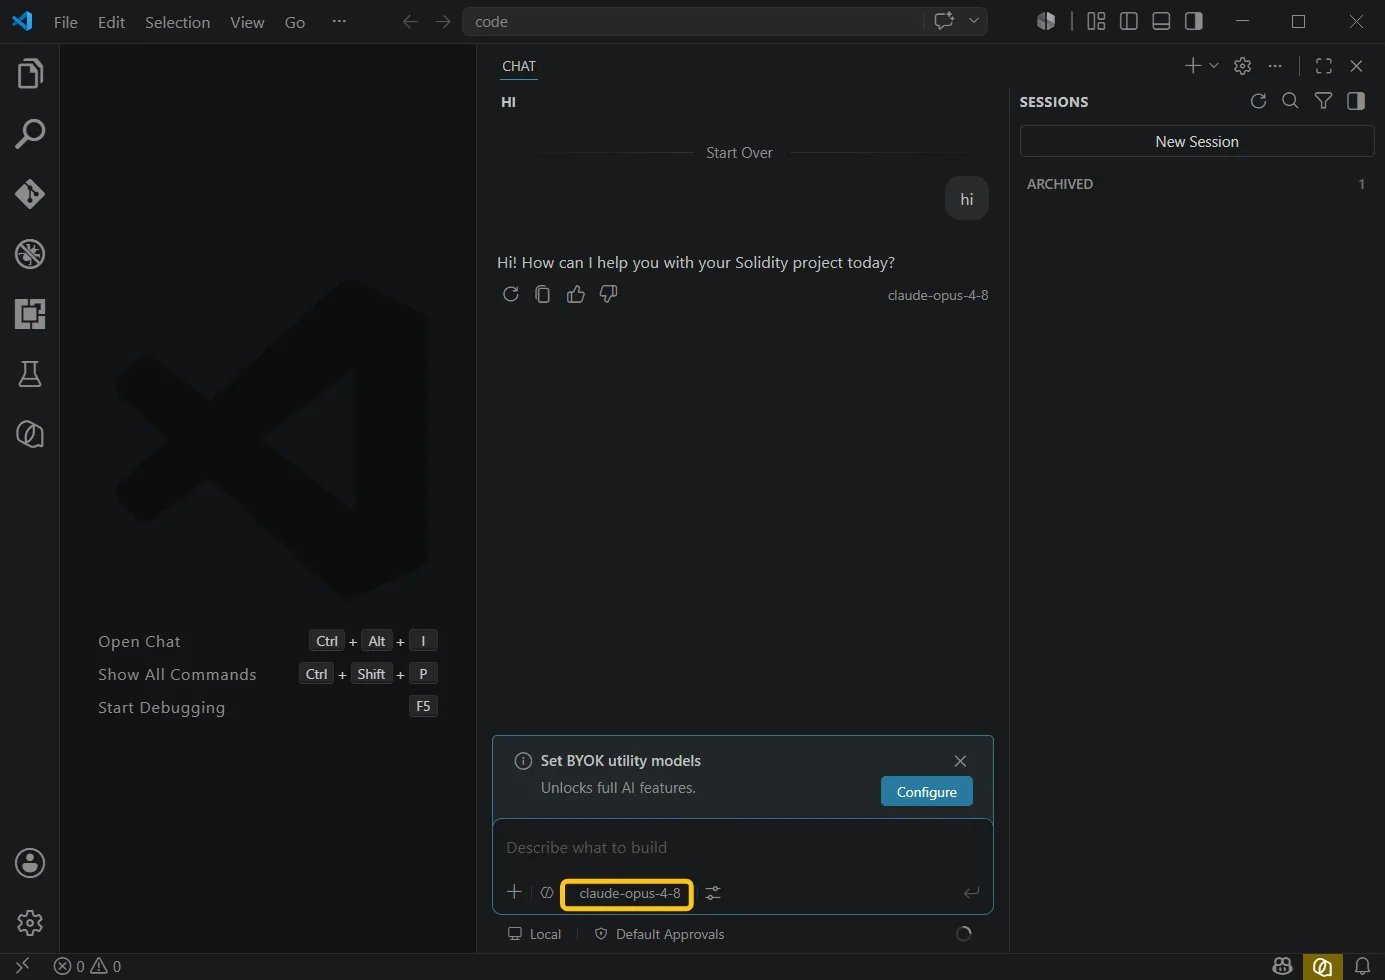
    **从底部菜单中选择你刚刚配置的模型。**\
    **现在即可开始使用。**

    <Frame>
      <img src="https://mintcdn.com/x6/el_h-gJpYp66h95k/images/image-99.webp?fit=max&auto=format&n=el_h-gJpYp66h95k&q=85&s=f08a59ece33dc5487f069df2c04477ed" alt="Image" width="1385" height="980" data-path="images/image-99.webp" />
    </Frame>
  </Step>
</Steps>