> ## Documentation Index
> Fetch the complete documentation index at: https://docs.preview.x6.ai/llms.txt
> Use this file to discover all available pages before exploring further.
# Claude Code
> 通过 x6.ai 使用 Claude Code — 从 Credits 中扣费,无需 Anthropic 订阅。
> 本文档仅供参考,演示如何配置我们的 API 与第三方 AI 聊天界面配合使用。文中提及的任何第三方软件、网站或服务均非由我们运营、控制或背书。
# **Claude Code 简介**
 [**Claude Code**](https://github.com/anthropics/claude-code) 是一款驻留在终端中的智能编程工具,能理解您的代码库,通过执行日常任务、解释复杂代码和处理 git 工作流来帮助您更快地编写代码——一切均通过自然语言命令完成。
**Claude Code** 核心特性:
* **自主行动**:直接读写文件、运行终端命令并修复 Bug。
* **完整上下文**:自动理解整个代码库,无需手动复制粘贴。
* **安全与控制**:支持一键回滚,关键操作需手动审批。
* **工具集成**:通过 SKILL.md 支持自定义复杂工作流。
## **步骤**
> 如果你已经安装了 Claude Code,请在 terminal 中运行以下命令更新到最新版,这可能需要管理员权限。
```shellscript theme={null}
claude update
```
你可以**手动**安装 Node.js 和对应的 Coding Agent:
首先安装 [最新 LTS 版本的 Node.js](https://nodejs.org/en/download/),然后在终端中使用 npm 全局安装:
```shellscript theme={null}
npm install -g @anthropic-ai/claude-code
```
**macOS、Linux、WSL:**
```shellscript theme={null}
curl -fsSL https://claude.ai/install.sh | bash
```
**Windows PowerShell:**
```powershell theme={null}
irm https://claude.ai/install.ps1 | iex
```
**Windows CMD:**
```powershell theme={null}
curl -fsSL https://claude.ai/install.cmd -o install.cmd && install.cmd && del install.cmd
```
如果看到 `The token '&&' is not a valid statement separator`,说明您在 PowerShell 而非 CMD 中。如果看到 `'irm' is not recognized as an internal or external command`,说明您在 CMD 而非 PowerShell 中。PowerShell 提示符显示 `PS C:\`,CMD 提示符显示 `C:\`(无 `PS`)。
**原生 Windows 安装需要 [Git for Windows](https://git-scm.com/downloads/win)。** 如果尚未安装,请先安装它。WSL 安装不需要此步骤。
原生安装会在后台自动更新,始终保持最新版本。
从 [VS Code](https://code.visualstudio.com/download) 应用市场**安装** [**Claude Code** 扩展](https://marketplace.visualstudio.com/items?itemName=anthropic.claude-code) — 无需单独安装 CLI。VS Code 扩展直接在编辑器中提供内联差异、@-mentions、计划审查和对话历史。
[**Claude Code**](https://github.com/anthropics/claude-code) 是一款驻留在终端中的智能编程工具,能理解您的代码库,通过执行日常任务、解释复杂代码和处理 git 工作流来帮助您更快地编写代码——一切均通过自然语言命令完成。
**Claude Code** 核心特性:
* **自主行动**:直接读写文件、运行终端命令并修复 Bug。
* **完整上下文**:自动理解整个代码库,无需手动复制粘贴。
* **安全与控制**:支持一键回滚,关键操作需手动审批。
* **工具集成**:通过 SKILL.md 支持自定义复杂工作流。
## **步骤**
> 如果你已经安装了 Claude Code,请在 terminal 中运行以下命令更新到最新版,这可能需要管理员权限。
```shellscript theme={null}
claude update
```
你可以**手动**安装 Node.js 和对应的 Coding Agent:
首先安装 [最新 LTS 版本的 Node.js](https://nodejs.org/en/download/),然后在终端中使用 npm 全局安装:
```shellscript theme={null}
npm install -g @anthropic-ai/claude-code
```
**macOS、Linux、WSL:**
```shellscript theme={null}
curl -fsSL https://claude.ai/install.sh | bash
```
**Windows PowerShell:**
```powershell theme={null}
irm https://claude.ai/install.ps1 | iex
```
**Windows CMD:**
```powershell theme={null}
curl -fsSL https://claude.ai/install.cmd -o install.cmd && install.cmd && del install.cmd
```
如果看到 `The token '&&' is not a valid statement separator`,说明您在 PowerShell 而非 CMD 中。如果看到 `'irm' is not recognized as an internal or external command`,说明您在 CMD 而非 PowerShell 中。PowerShell 提示符显示 `PS C:\`,CMD 提示符显示 `C:\`(无 `PS`)。
**原生 Windows 安装需要 [Git for Windows](https://git-scm.com/downloads/win)。** 如果尚未安装,请先安装它。WSL 安装不需要此步骤。
原生安装会在后台自动更新,始终保持最新版本。
从 [VS Code](https://code.visualstudio.com/download) 应用市场**安装** [**Claude Code** 扩展](https://marketplace.visualstudio.com/items?itemName=anthropic.claude-code) — 无需单独安装 CLI。VS Code 扩展直接在编辑器中提供内联差异、@-mentions、计划审查和对话历史。
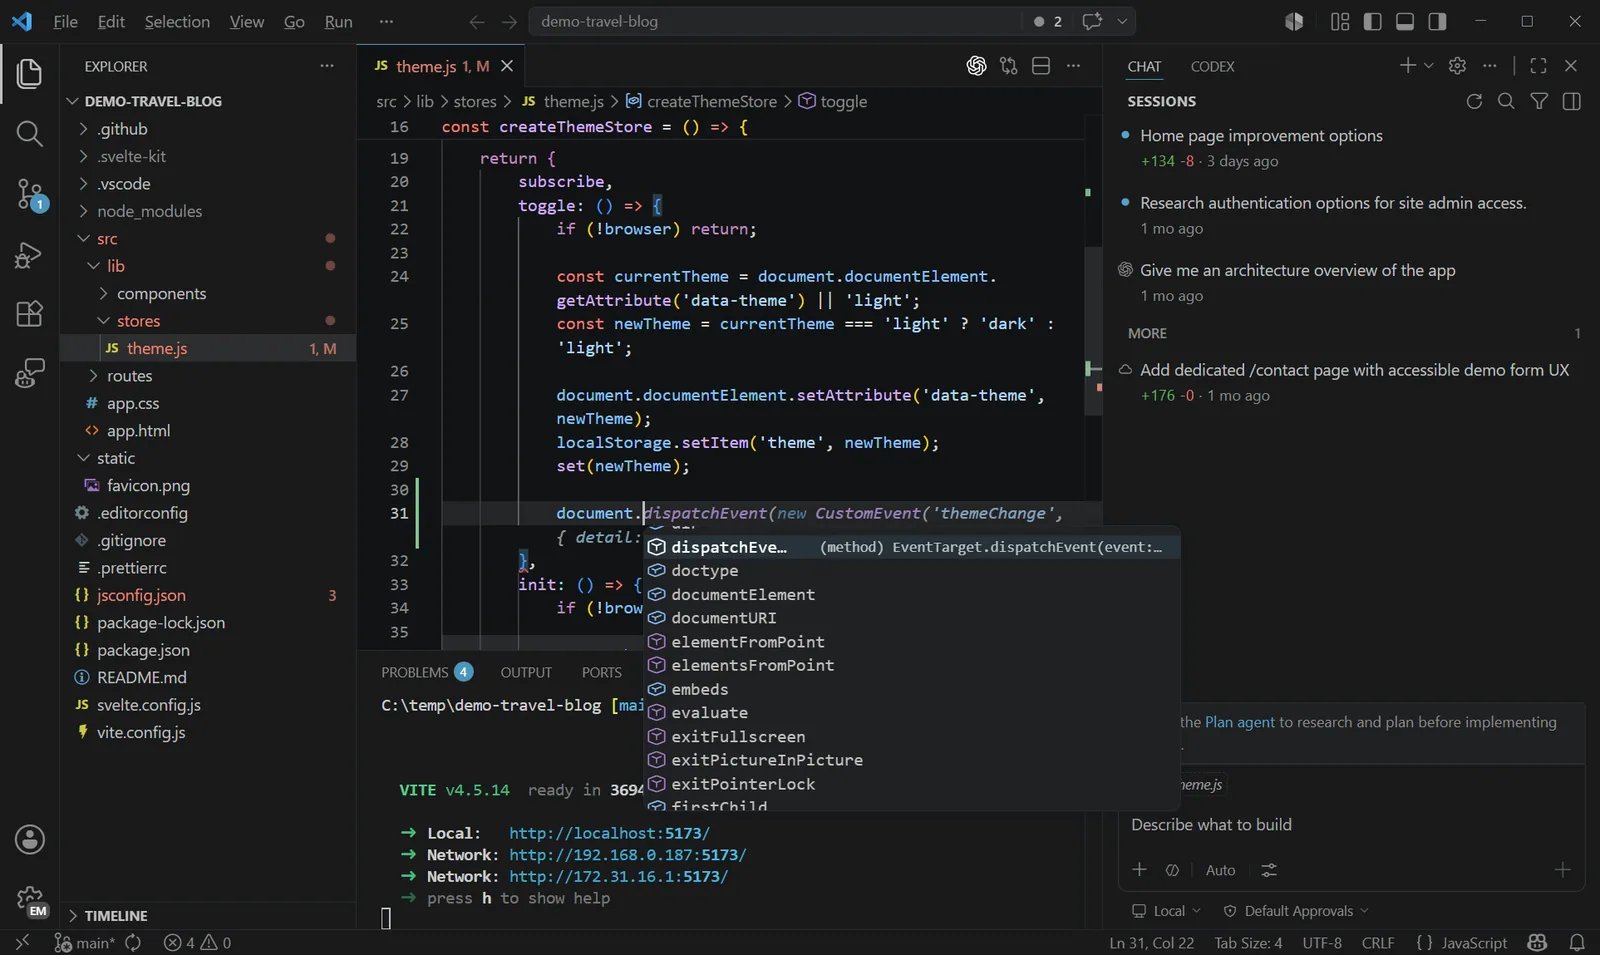 请按照[**官方教程**](https://code.claude.com/docs/en/desktop-quickstart)完成安装。
Claude Code 官方支持通过配置系统管理持久化配置。日常使用时,建议优先将配置写入 `settings.json`。Shell 或系统环境变量更适合临时切换、CI 场景,或作为当前版本已知问题的备用方案。
**编辑或创建** settings.json 文件
请按照[**官方教程**](https://code.claude.com/docs/en/desktop-quickstart)完成安装。
Claude Code 官方支持通过配置系统管理持久化配置。日常使用时,建议优先将配置写入 `settings.json`。Shell 或系统环境变量更适合临时切换、CI 场景,或作为当前版本已知问题的备用方案。
**编辑或创建** settings.json 文件
macOS 和 Linux:`~/.claude/settings.json`
Windows:`C:\Users\\.claude\settings.json`
请确保将 `` 替换为从 [x6.ai Key](https://x6.ai/settings/api-keys) 获取的实际 Key,**替换时请勿保留尖括号**`< `**和** `>`。
```json theme={null}
{
"env": {
"ANTHROPIC_AUTH_TOKEN": "",
"ANTHROPIC_BASE_URL": "https://api.x6.ai",
"API_TIMEOUT_MS": "3000000",
"CLAUDE_CODE_DISABLE_NONESSENTIAL_TRAFFIC": "1",
"ANTHROPIC_DEFAULT_HAIKU_MODEL": "claude-haiku-4-5",
"ANTHROPIC_DEFAULT_SONNET_MODEL": "claude-sonnet-5",
"ANTHROPIC_DEFAULT_OPUS_MODEL": "claude-opus-5",
"ANTHROPIC_DEFAULT_FABLE_MODEL": "claude-fable-5"
}
}
```
打开 VS Code 的 `settings.json` 。
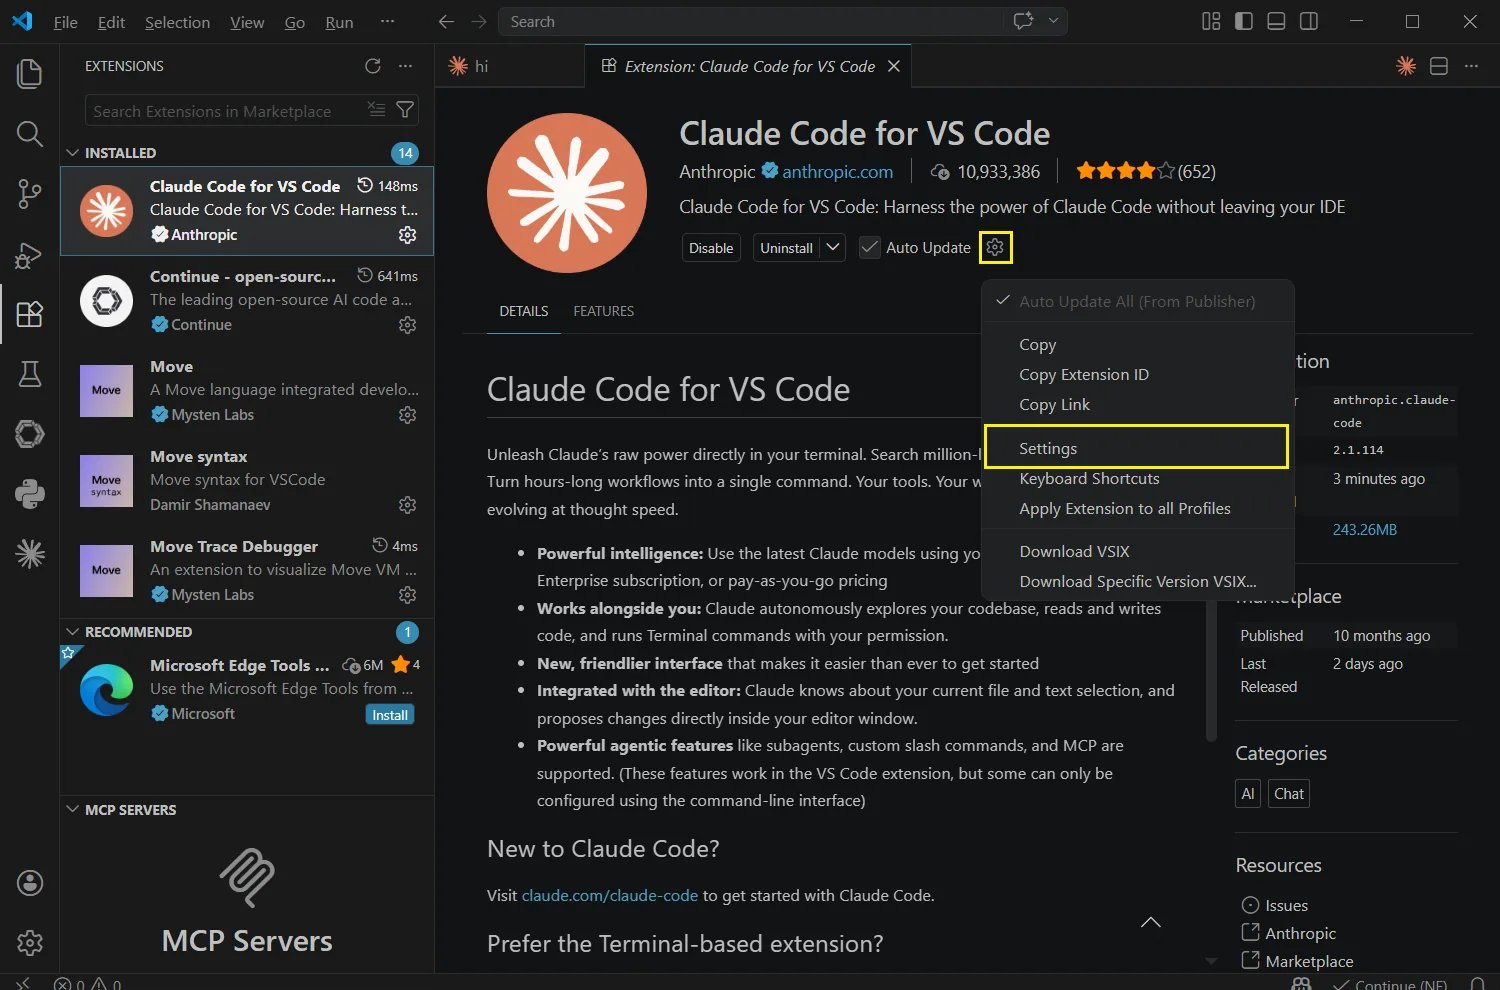 在 \*\*Environment Variables \*\*下点击 **"Edit in settings.json"**。
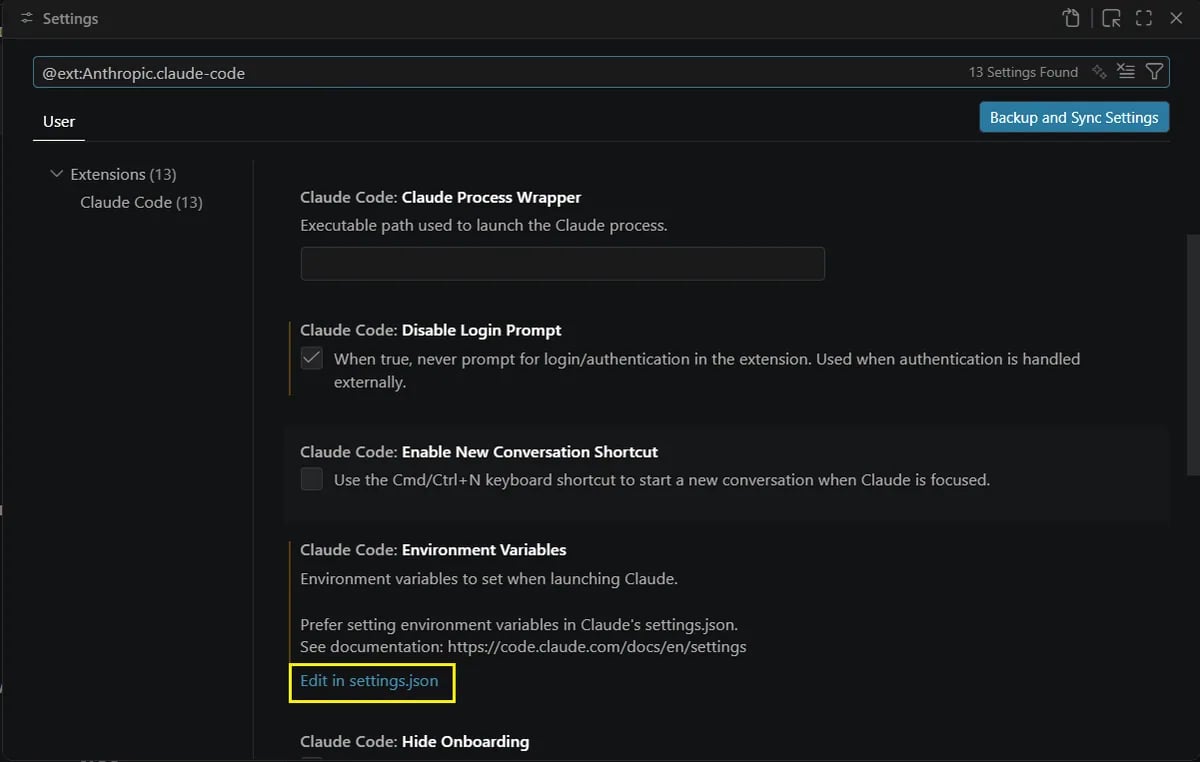 添加以下内容。请确保将 `` 替换为从 [x6.ai Key](https://x6.ai/settings/api-keys) 获取的实际 Key。
```json theme={null}
{
"claudeCode.disableLoginPrompt": true,
"claudeCode.preferredLocation": "panel",
"claudeCode.environmentVariables": [
{"name":"ANTHROPIC_AUTH_TOKEN","value":""},
{"name":"ANTHROPIC_BASE_URL","value":"https://api.x6.ai"}
]
}
```
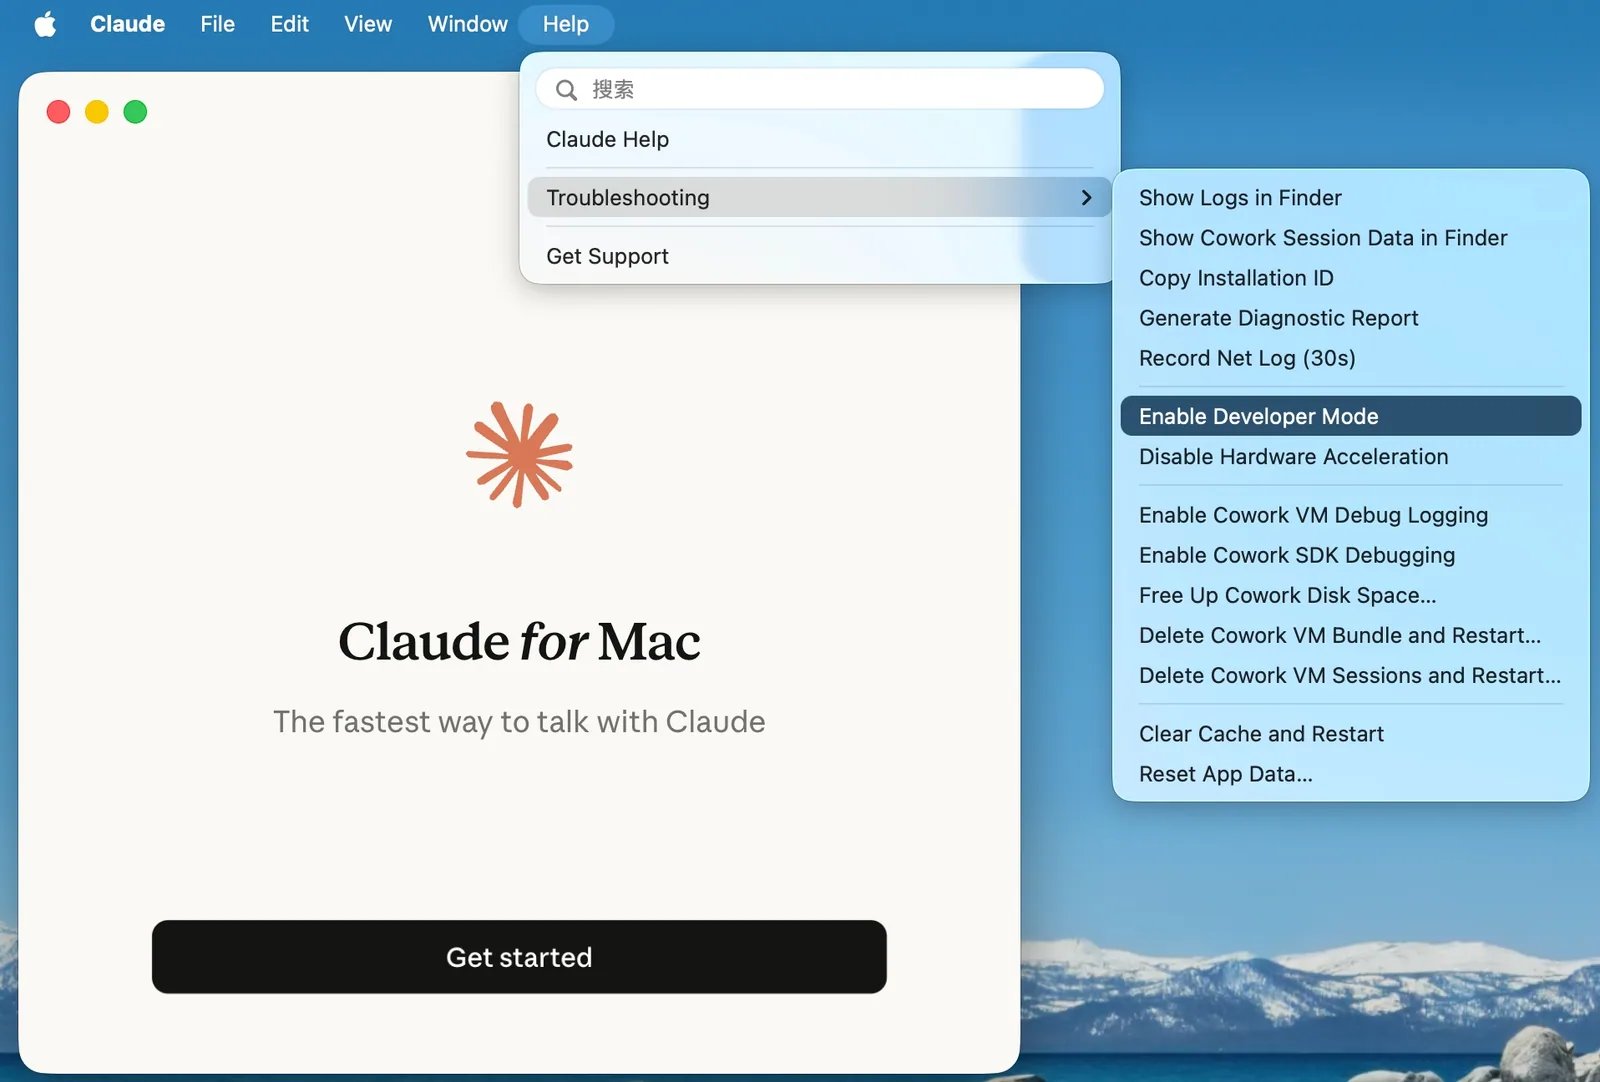
打开安装完成的 Claude Desktop APP
* 依次点击顶部菜单栏的 **Help(帮助)** -> **Troubleshooting(疑难解答)**。
* 在弹出的子菜单中点击 **Enable Developer Mode(启用开发者模式)**。
* Windows 用户点击 Claude Desktop APP 左上角即可看到同样内容。
添加以下内容。请确保将 `` 替换为从 [x6.ai Key](https://x6.ai/settings/api-keys) 获取的实际 Key。
```json theme={null}
{
"claudeCode.disableLoginPrompt": true,
"claudeCode.preferredLocation": "panel",
"claudeCode.environmentVariables": [
{"name":"ANTHROPIC_AUTH_TOKEN","value":""},
{"name":"ANTHROPIC_BASE_URL","value":"https://api.x6.ai"}
]
}
```
打开安装完成的 Claude Desktop APP
* 依次点击顶部菜单栏的 **Help(帮助)** -> **Troubleshooting(疑难解答)**。
* 在弹出的子菜单中点击 **Enable Developer Mode(启用开发者模式)**。
* Windows 用户点击 Claude Desktop APP 左上角即可看到同样内容。
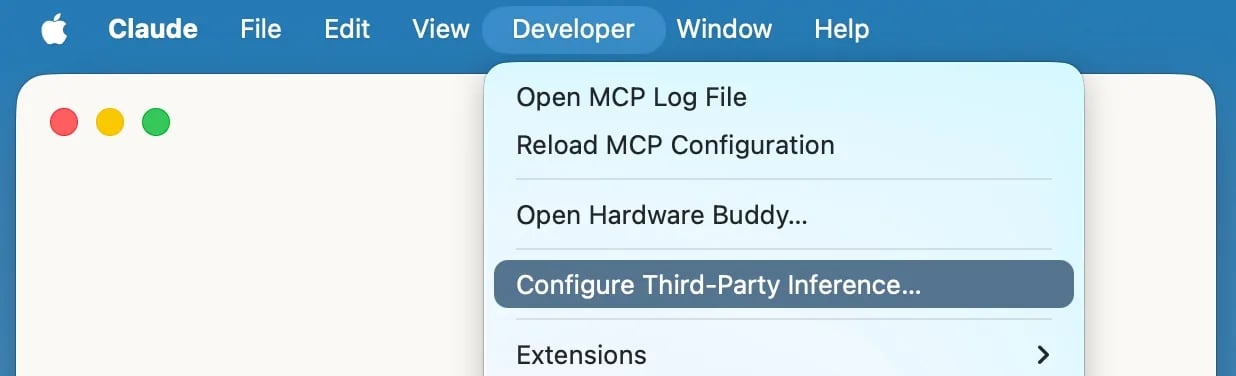
 * 启用成功后,顶部菜单栏会多出一个 **Developer(开发者)** 菜单。
* 在 "Developer" 菜单中选择 "Configure Third-Party Inference..."。
* 启用成功后,顶部菜单栏会多出一个 **Developer(开发者)** 菜单。
* 在 "Developer" 菜单中选择 "Configure Third-Party Inference..."。
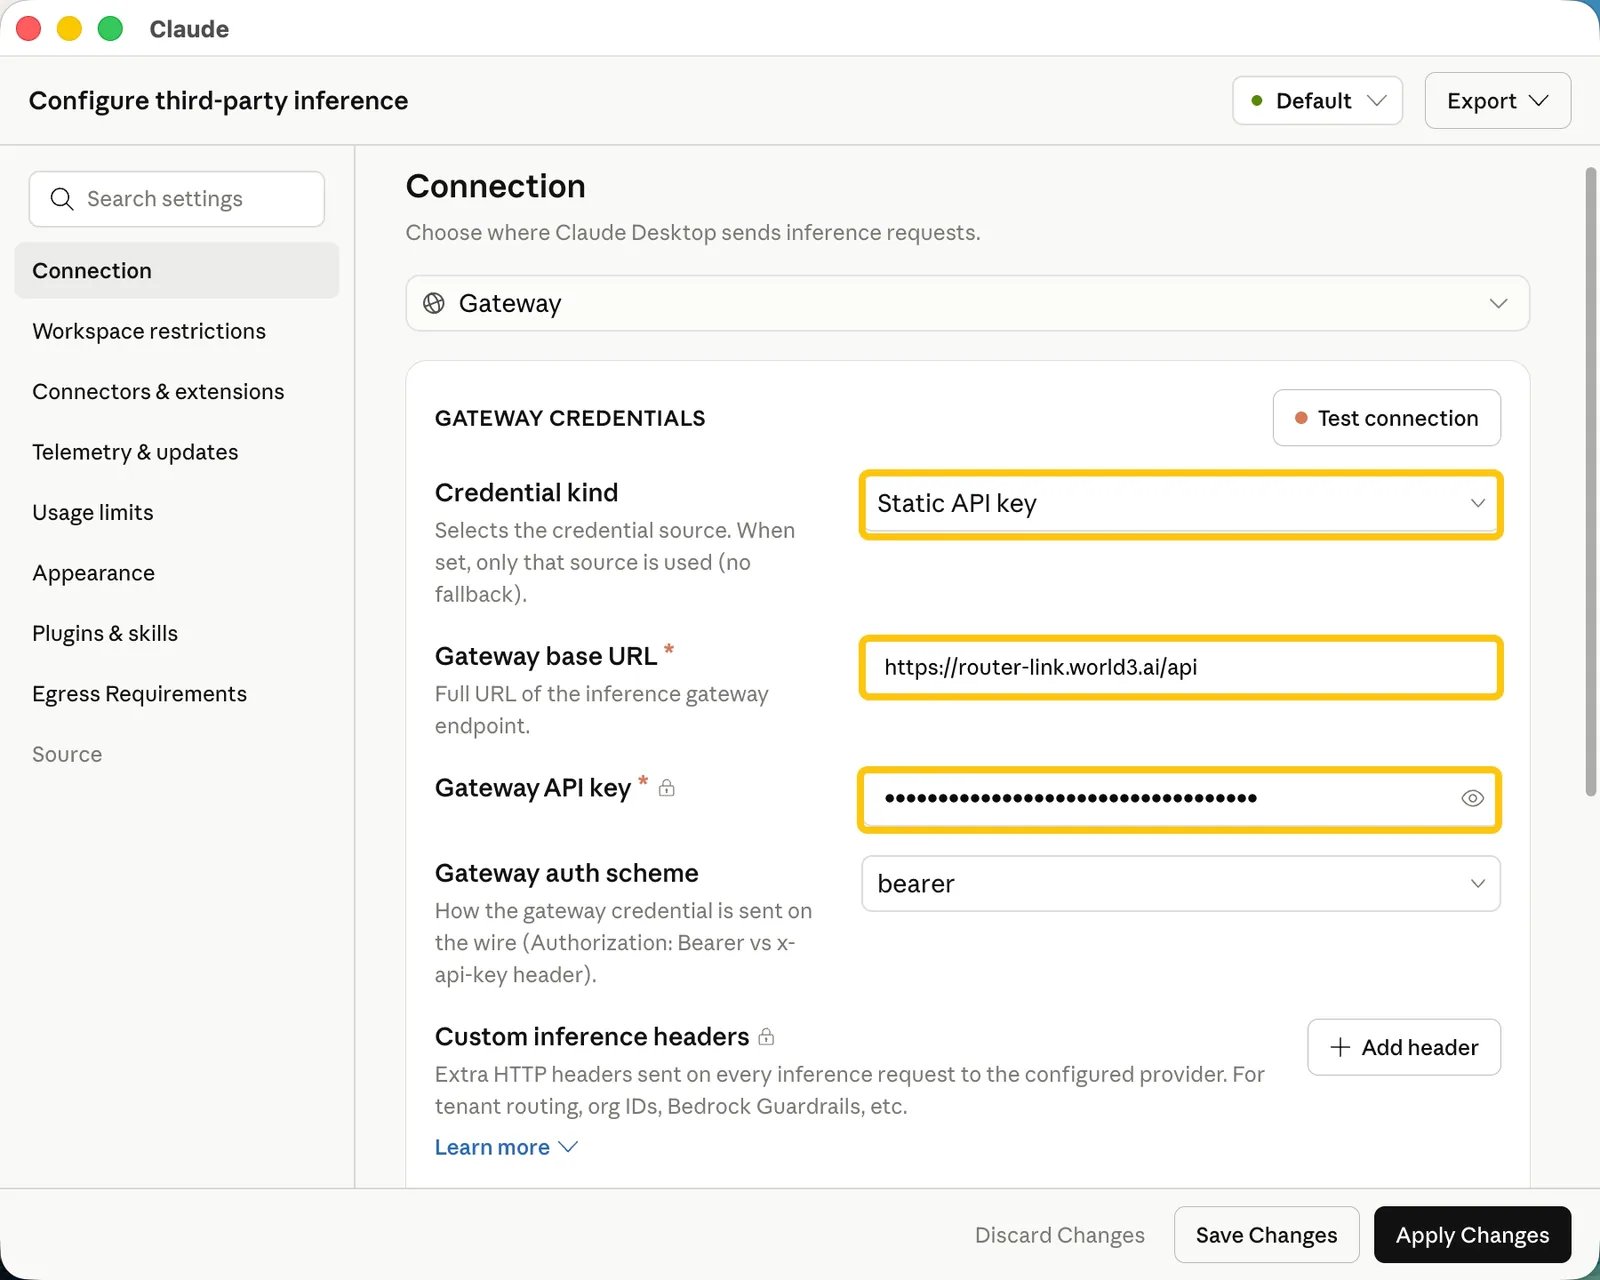
 * Credential kind 选择 “Static API key”。
* Gateway base URL 填入 ”[https://api.x6.ai](https://api.x6.ai)“。
* Gateway API key 为从 [**x6.ai Key**](https://x6.ai/settings/api-keys) 获取的实际 Key 。
* Credential kind 选择 “Static API key”。
* Gateway base URL 填入 ”[https://api.x6.ai](https://api.x6.ai)“。
* Gateway API key 为从 [**x6.ai Key**](https://x6.ai/settings/api-keys) 获取的实际 Key 。
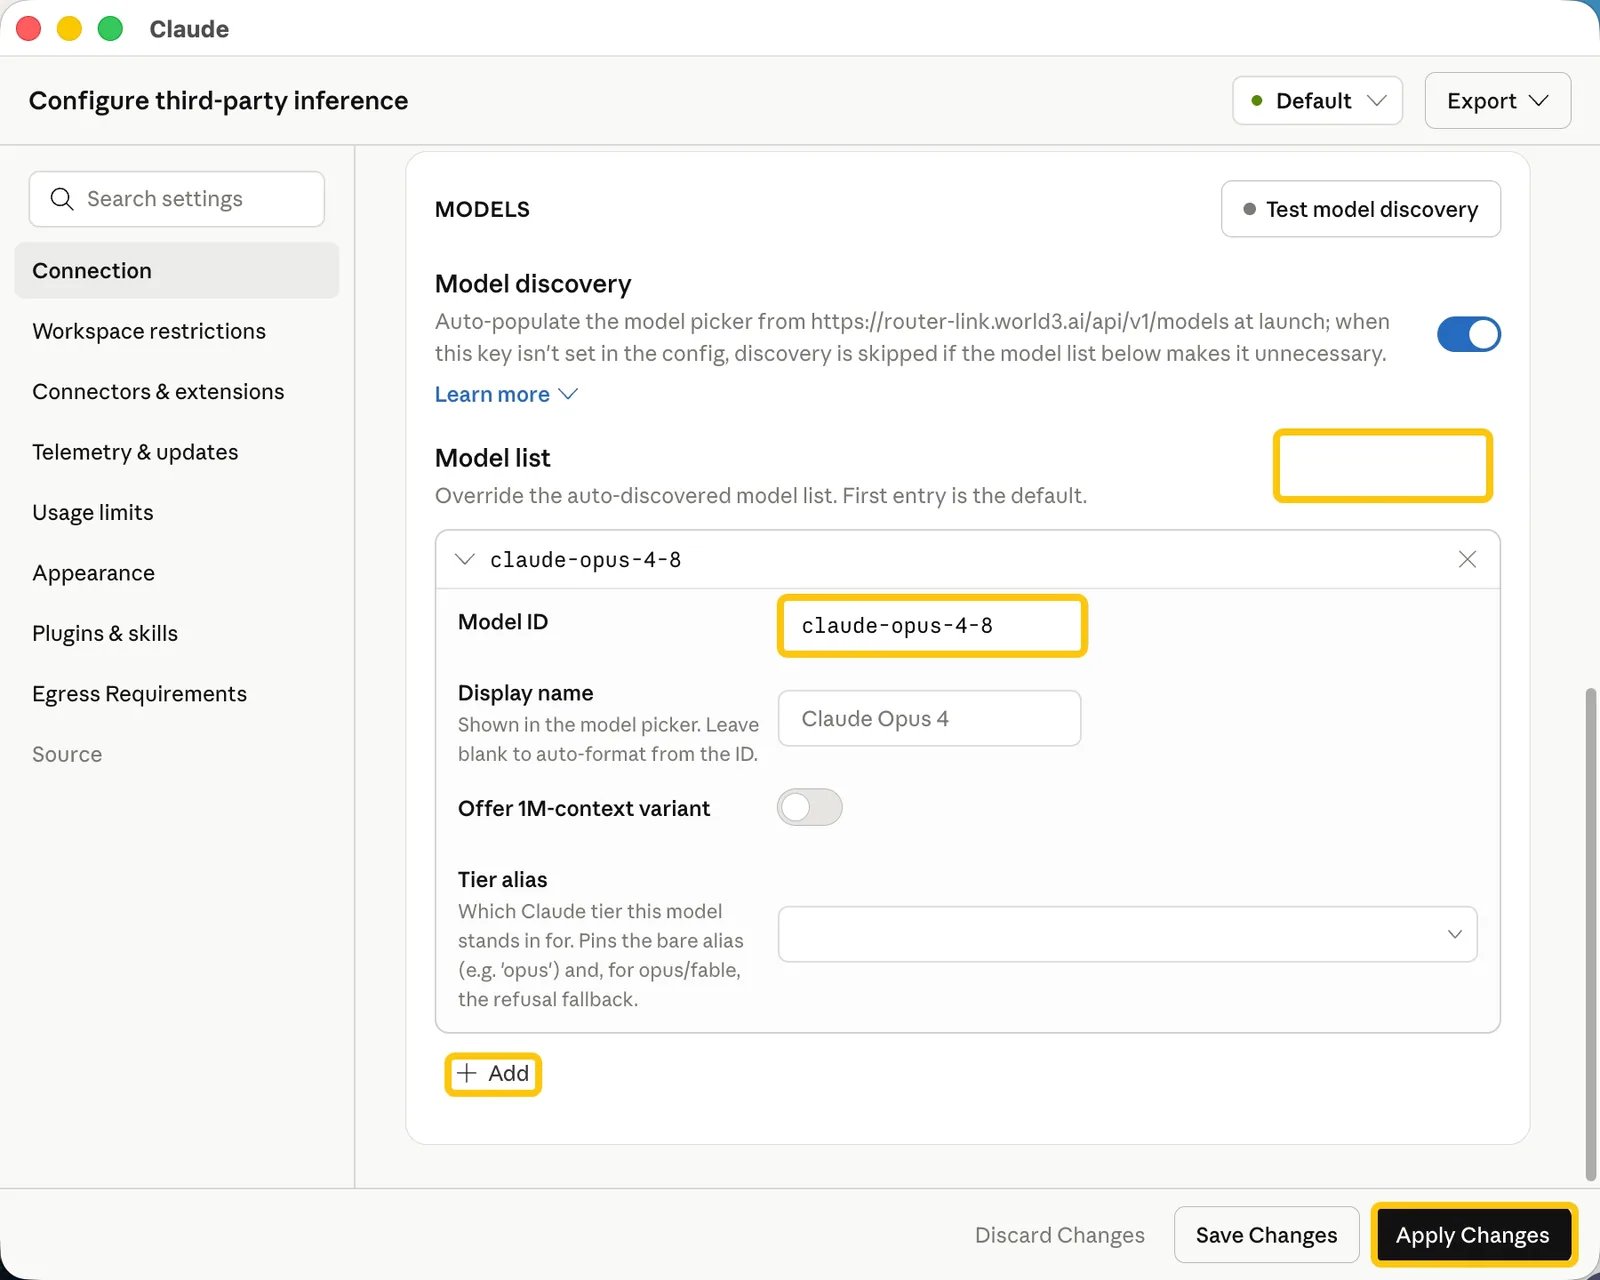
 * 页面向下滚动,点击“Add model”。
* 在 Model ID 中填入”claude-opus-5”,点击下方的“Add”,按照相同步骤添加”claude-sonnet-5“,”claude-haiku-4-5“和“claude-fable-5”。
* Offer 1M-context variant 可作为可选项启动。
* 最后点击”Apply Changes“。
* 页面向下滚动,点击“Add model”。
* 在 Model ID 中填入”claude-opus-5”,点击下方的“Add”,按照相同步骤添加”claude-sonnet-5“,”claude-haiku-4-5“和“claude-fable-5”。
* Offer 1M-context variant 可作为可选项启动。
* 最后点击”Apply Changes“。
 导航至您的代码工作目录,在终端运行 `claude` 命令即可开始使用 Claude Code:
```shellscript theme={null}
claude
```
首次使用 Claude Code 时,可能会被强制要求登录 Anthropic 账号。
导航至您的代码工作目录,在终端运行 `claude` 命令即可开始使用 Claude Code:
```shellscript theme={null}
claude
```
首次使用 Claude Code 时,可能会被强制要求登录 Anthropic 账号。
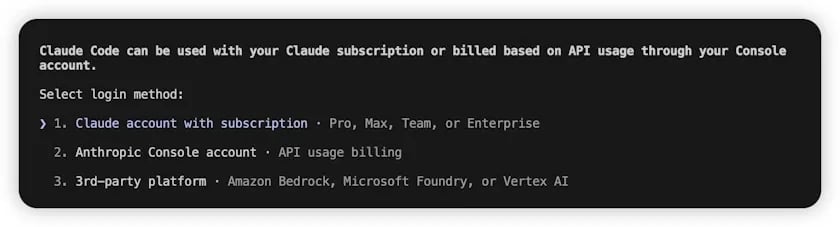 1. 请按以下步骤跳过此流程:
2. 在用户主目录中打开或创建 `.claude.json` 文件。具体路径如下:macOS / Linux:`~/.claude.json`,Windows:`C:\Users\\.claude.json`
3. 将 `hasCompletedOnboarding` 字段的值设置为 `true`。
```json theme={null}
{
"hasCompletedOnboarding": true
}
```
保存文件后,在终端重新运行 `claude`。
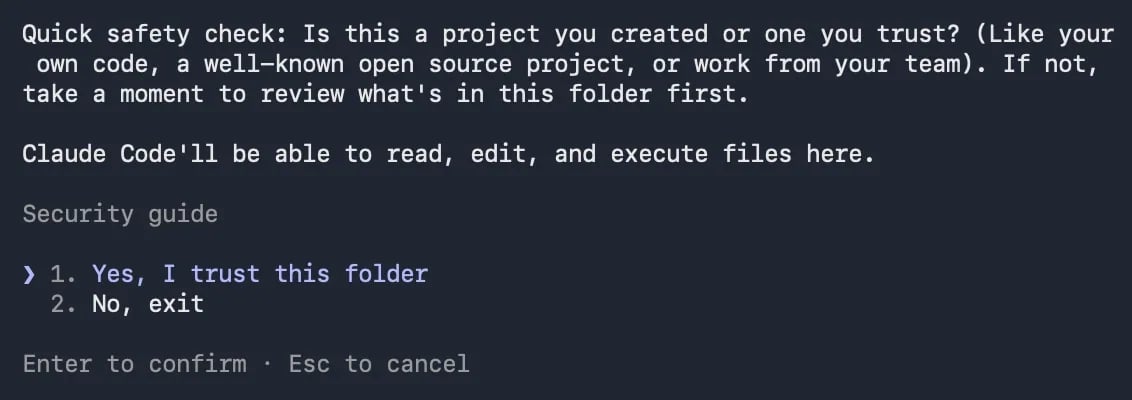
启动后,选择信任 Claude Code 访问该文件夹中的文件,如下所示:
1. 请按以下步骤跳过此流程:
2. 在用户主目录中打开或创建 `.claude.json` 文件。具体路径如下:macOS / Linux:`~/.claude.json`,Windows:`C:\Users\\.claude.json`
3. 将 `hasCompletedOnboarding` 字段的值设置为 `true`。
```json theme={null}
{
"hasCompletedOnboarding": true
}
```
保存文件后,在终端重新运行 `claude`。
启动后,选择信任 Claude Code 访问该文件夹中的文件,如下所示:
 完成!您现在可以正常使用 Claude Code。
点击左侧的 Claude 图标,然后选择"新建会话"即可开始使用 Claude Code for VS Code。
完成!您现在可以正常使用 Claude Code。
点击左侧的 Claude 图标,然后选择"新建会话"即可开始使用 Claude Code for VS Code。
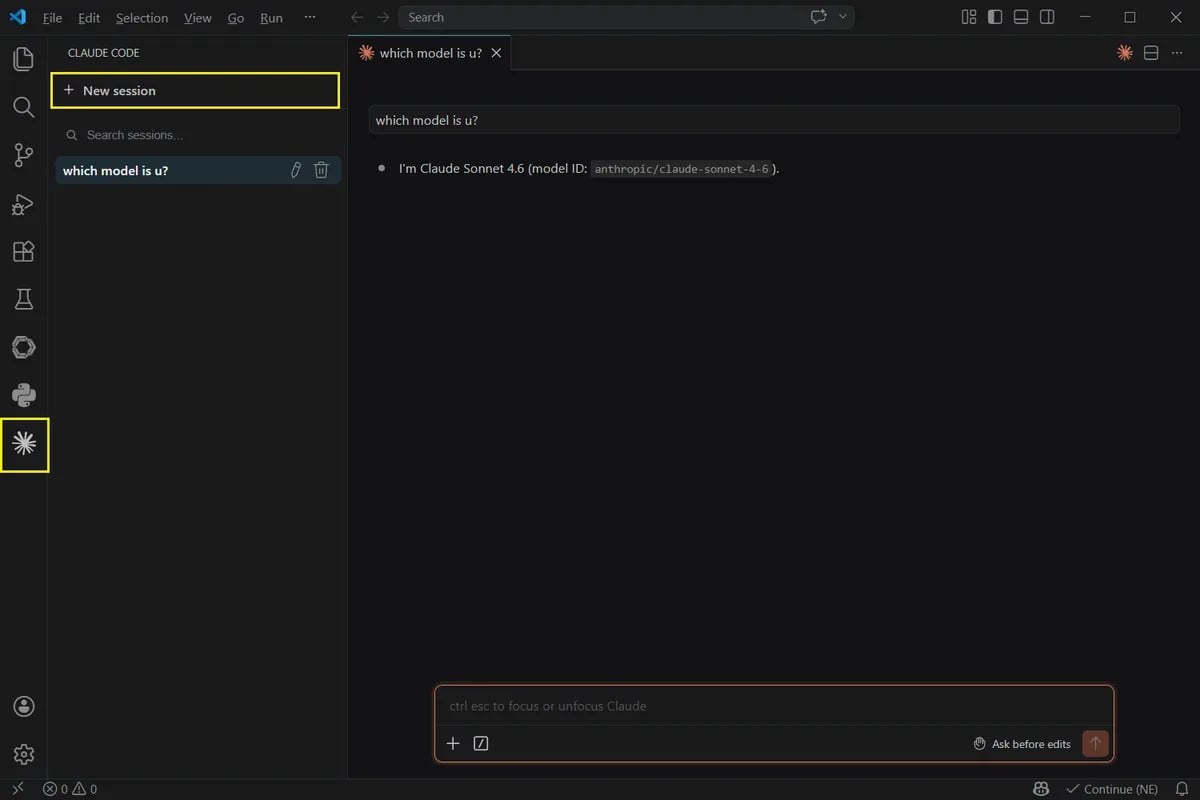 完成!您现在可以使用 Claude Code for VS Code。
**Windows 启用虚拟化**
Cowork 在虚拟环境中运行,Windows 需要先启用 Virtual Machine Platform 特性,否则安装后 Cowork 不可用。以管理员身份打开 PowerShell 执行下面的命令,然后重启系统:
```powershell theme={null}
Enable-WindowsOptionalFeature -Online -FeatureName VirtualMachinePlatform -All -NoRestart
```
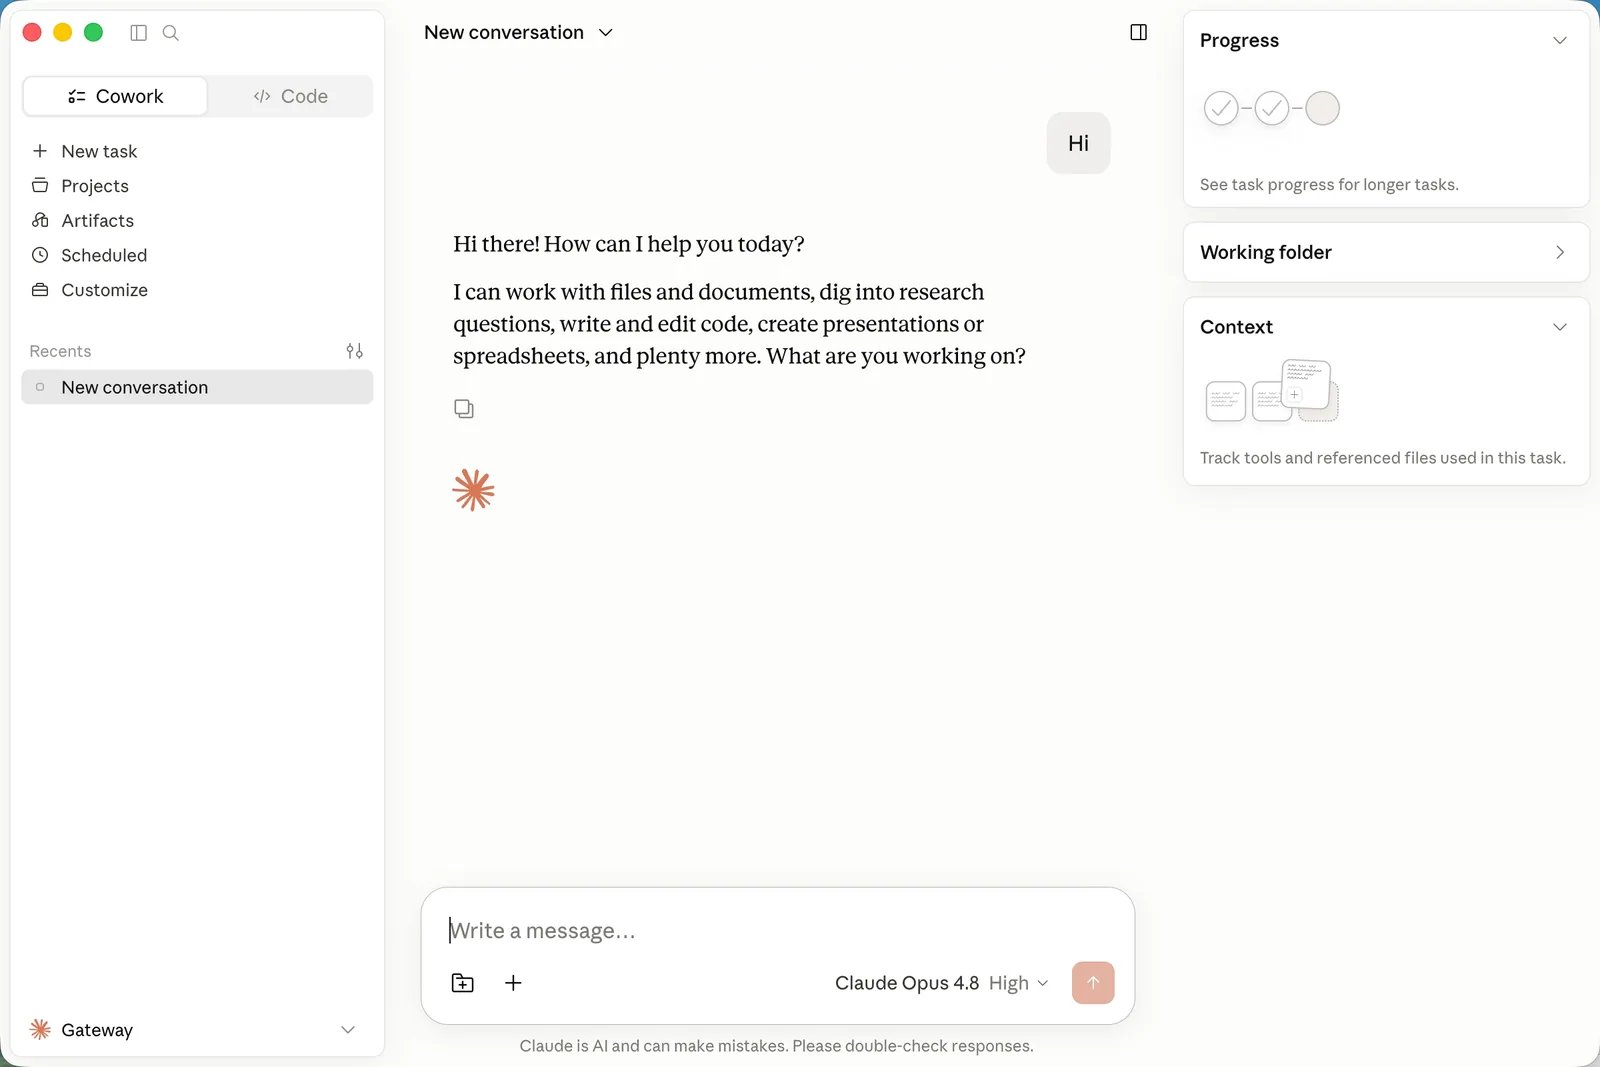
打开 Claude Desktop App,就可以开始使用了!
完成!您现在可以使用 Claude Code for VS Code。
**Windows 启用虚拟化**
Cowork 在虚拟环境中运行,Windows 需要先启用 Virtual Machine Platform 特性,否则安装后 Cowork 不可用。以管理员身份打开 PowerShell 执行下面的命令,然后重启系统:
```powershell theme={null}
Enable-WindowsOptionalFeature -Online -FeatureName VirtualMachinePlatform -All -NoRestart
```
打开 Claude Desktop App,就可以开始使用了!
 # **故障排除**
请确保您的 API 输入正确。由于 Anthropic 模型 Token 消耗较高,每日免费额度可能不足以支持该模型。请为您的账户充值。
Claude Code 只支持 Anthropic 格式的 API
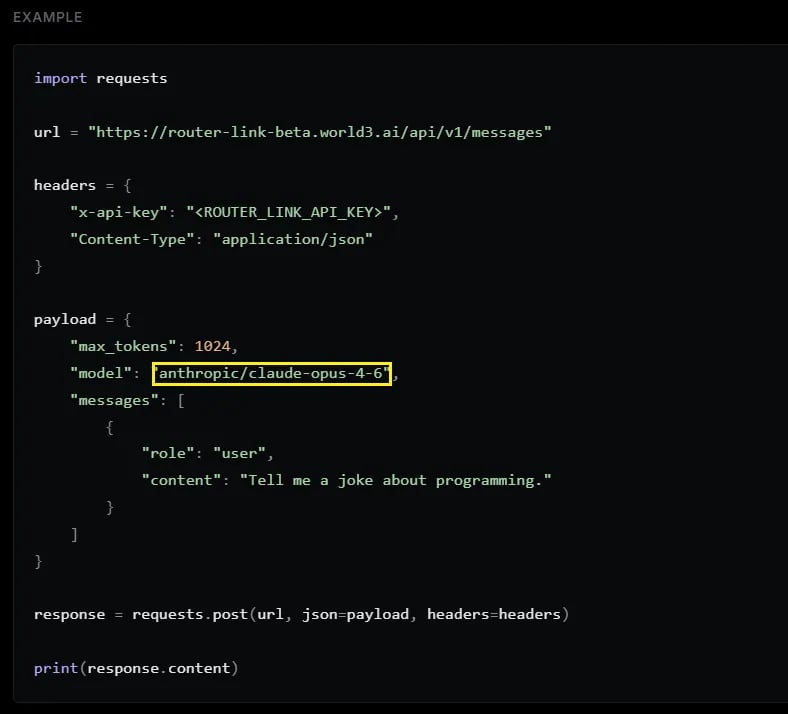
前往 [https://x6.ai/models](https://x6.ai/models)。点击模型,将 API 格式设置为"Anthropic",并在代码块中找到 `model` 字段。
从 `model` 字段复制模型名称,替换到上面的 `settings.json` 文件中。
# **故障排除**
请确保您的 API 输入正确。由于 Anthropic 模型 Token 消耗较高,每日免费额度可能不足以支持该模型。请为您的账户充值。
Claude Code 只支持 Anthropic 格式的 API
前往 [https://x6.ai/models](https://x6.ai/models)。点击模型,将 API 格式设置为"Anthropic",并在代码块中找到 `model` 字段。
从 `model` 字段复制模型名称,替换到上面的 `settings.json` 文件中。
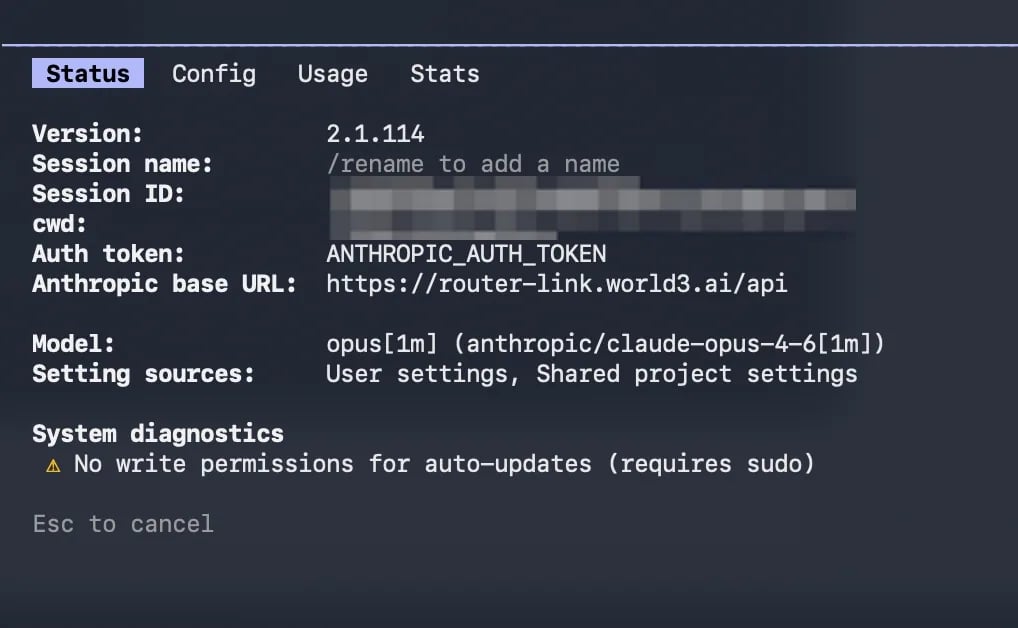
 打开一个新的终端窗口。运行 `claude` 启动 Claude Code。然后输入 `/model` 切换模型,最后输入 `/status` 验证模型状态。
 如果您手动编辑了 `~/.claude/settings.json` 文件但更改未应用,请尝试以下操作:
1. 关闭所有 Claude Code 窗口。打开一个新的终端窗口并重新运行 `claude`。
2. 如果问题仍然存在,尝试删除 `~/.claude/settings.json` 文件并重新配置环境变量。Claude Code 将自动生成新的配置文件。
3. 确保配置文件的 JSON 格式正确。检查变量名错误、缺少逗号或多余逗号等问题。您可以使用在线 JSON 验证工具进行验证。
在终端输入以下命令:
```shellscript theme={null}
claude update
```
请查阅 [官方文档](https://support.claude.com/en/articles/12386420-claude-code-faq)。
如果您手动编辑了 `~/.claude/settings.json` 文件但更改未应用,请尝试以下操作:
1. 关闭所有 Claude Code 窗口。打开一个新的终端窗口并重新运行 `claude`。
2. 如果问题仍然存在,尝试删除 `~/.claude/settings.json` 文件并重新配置环境变量。Claude Code 将自动生成新的配置文件。
3. 确保配置文件的 JSON 格式正确。检查变量名错误、缺少逗号或多余逗号等问题。您可以使用在线 JSON 验证工具进行验证。
在终端输入以下命令:
```shellscript theme={null}
claude update
```
请查阅 [官方文档](https://support.claude.com/en/articles/12386420-claude-code-faq)。